


How Do You Adjust Rear Derailleur: A Beginner's Guide
From Clicks to Shifts
Is there anything more frustrating than an electric bike that won't shift properly? That grinding sound happens when the chain hesitates between gears, the sudden skip just as you stand up to climb a hill, or the complete refusal to shift into the gear you need. These are common problems. The good news is that you don't need to be a pro mechanic to fix them. Adjusting a bicycle derailleur is a manageable and incredibly rewarding DIY skill.
This guide will walk you through a step-by-step process to transform your shifting from frustrating to flawless. We'll break down the process and help you tune your own bike. We will focus mainly on the rear derailleur, which handles most of your shifting. The process comes down to a few key checks and three basic adjustments: setting the limit screws, fine-tuning the cable tension (also known as indexing), and adjusting the B-tension. Let's get your bike running smoothly again.
Pre-Adjustment Check
Before you touch a single screw, you need to do a quick inspection. Many shifting problems are not caused by the derailleur's adjustment but by other issues. Skipping these checks is the number one reason beginners get frustrated. Taking five minutes here can save you hours of headache.
-
Check the Derailleur Hanger
The derailleur hanger is the small piece of metal that connects your rear derailleur to the bike's frame. It's designed to bend or break in an impact to protect your frame. Because of this, it's also the most common hidden cause of poor shifting. Stand behind your bike and look at the derailleur. It should hang perfectly vertical, parallel to the cogs on your cassette. If the hanger is even slightly bent inward or outward, no amount of adjustment will ever result in perfect shifting. If it looks bent, it must be straightened with a special tool or replaced before you proceed. -
Inspect Cables and Housing
Your gear cables and their outer housing are the communication lines between your shifters and your derailleurs. If these lines are damaged, the signals get mixed up. Look for frayed cable ends, especially near the derailleur's anchor bolt. Check the housing for any sharp kinks, cracks, or rust where it enters the frame or the derailleur. Old, sticky, or rusted cables are a main cause of slow or hesitant shifting, as they create friction that the derailleur's spring can't overcome. If your cables look worn out, it's best to replace them for a truly fresh start. -
Clean Your Drivetrain
A clean bike is a happy bike, and this is especially true for the drivetrain. A thick layer of grime, old lube, and dirt on your chain, cassette cogs, and derailleur pulleys can severely hurt shifting performance. The chain needs to move freely from cog to cog, and gunk gets in the way. Before making adjustments, give your drivetrain a thorough cleaning and re-lubrication. Often, simply having a clean and properly lubricated drivetrain can solve minor shifting issues all by itself.

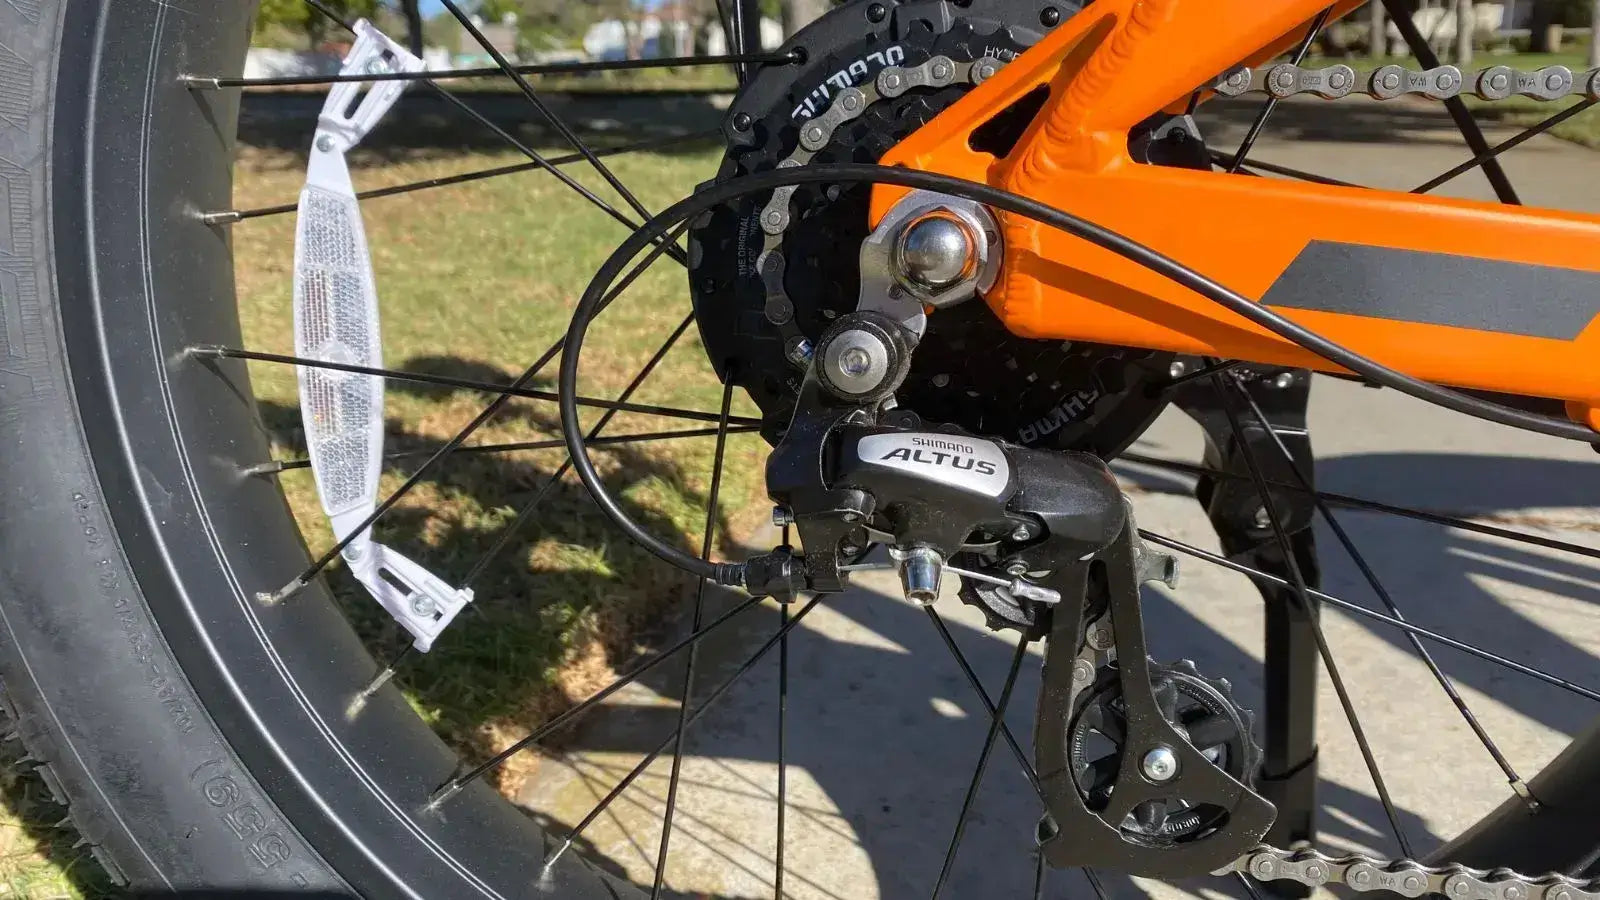
Anatomy of Your Derailleur
To adjust the derailleur, you need to know the key parts. Learning about these parts will make the process much less scary.
- The Derailleur Body: This is the main assembly that pivots and moves the chain across the gears. It contains a spring that provides tension to pull the chain backward.
- Jockey Wheels / Pulleys: These are the two small, toothed wheels at the bottom of the derailleur that the chain runs through. The top one is the guide pulley, and the bottom one is the tension pulley.
- Limit Screws (H and L): These are two small screws, often located side-by-side on the derailleur body. They act as physical stops to prevent the chain from falling off the cassette. The H-screw sets the outward limit (for the highest gear, or smallest cog), and the L-screw sets the inward limit (for the lowest gear, or largest cog).
- Barrel Adjuster: This is a small, knurled knob that the gear cable housing runs into, either on the derailleur itself or sometimes up at the shifter. It's your primary tool for fine-tuning cable tension, which is the key to crisp, clean shifts between gears. This process is called indexing.
- B-Tension Screw: This single screw, often located at the top rear of the derailleur, controls the angle of the derailleur body. Its job is to adjust the distance between the top jockey wheel and the cassette cogs.
Rear Derailleur Adjustment
With the pre-checks done, it's time for the main event. Follow these steps in order for a systematic and successful adjustment.
Step 0: Get Set Up
First, gather your tools. You'll likely need a Phillips head screwdriver, a set of Allen keys (usually 4mm or 5mm), a rag, and some chain lubricant.
Most importantly, you need to get the rear wheel off the ground so you can pedal the bike while making adjustments. The best tool for this is a bike repair stand. If you don't have one, you can hang the nose of your saddle over a sturdy horizontal bar or have a friend carefully lift the rear of the bike for you.
Step 1: Set the High (H) Limit Screw
This step ensures the chain won't fall off the outside of your cassette.
- Shift your chain onto the smallest cog on the rear cassette (the highest, or hardest, gear). Keep clicking your shifter until you're sure it's in its final position.
- Loosen the cable anchor bolt on the derailleur and completely detach the gear cable. This temporarily takes cable tension out of the equation.
- With the cable detached, pedal gently. The chain should stay on the smallest cog. Now, look from directly behind the bike. The center of the top guide pulley should be perfectly aligned with the outer edge of the smallest cog. Use the H-limit screw to make this adjustment. Turning it clockwise moves the derailleur inward (left), and turning it counter-clockwise moves it outward (right). Your goal is a precise alignment of the guide pulley and the smallest cog.
Step 2: Attach Cable and Set Tension
Now we'll reconnect the system.
- Find the barrel adjuster on your rear derailleur. Turn it all the way in (clockwise) until it gently stops, then back it out one or two full turns (counter-clockwise). This gives you room to make fine-tuning adjustments in both directions later.
- Pull the gear cable taut with your fingers—it should be snug, not stretched—and re-clamp it with the anchor bolt. Trim any excess cable, leaving about an inch or two, and crimp a cable end on to prevent fraying.
Step 3: Index the Gears
This is the fine-tuning step where you dial in crisp, responsive shifting.
- While pedaling at a steady pace, shift up one gear (to the second smallest cog).
- If the chain is hesitant or noisy and struggles to make the shift to the larger cog, it needs more cable tension. Turn the barrel adjuster counter-clockwise a quarter-turn at a time until the shift is smooth and quiet.
- If the chain over-shifts and tries to jump to the third cog, you have too much tension. Turn the barrel adjuster clockwise a quarter-turn at a time to reduce tension.
- Continue shifting up and down the cassette one gear at a time. The goal is to find the sweet spot where every single shift, both up and down, is quick, quiet, and decisive. Listen for the sounds. You're aiming for a quiet, smooth operation in each gear. Make small, quarter-turn adjustments at a time—it's often all you need.
Step 4: Set the Low (L) Limit Screw
This is a critical safety step to prevent the chain from shifting into your spokes, which can destroy your wheel and derailleur.
- Carefully shift the chain onto the largest cog on the cassette (the lowest, or easiest, gear).
- With the chain on the largest cog, gently push the derailleur body inward with your thumb to see if it has any more room to move. It shouldn't.
- Adjust the L-limit screw. Turning it clockwise tightens the limit, preventing the derailleur from moving further inward. Turning it counter-clockwise loosens it. You want the screw set so that the derailleur stops perfectly at the largest cog, allowing for a smooth shift onto it but preventing any possibility of over-shifting into the spokes.

Step 5: Adjust the B-Tension
The final step is setting the distance between the derailleur and the cassette for optimal chain wrap.
- While still in the largest cog, look at the gap between the teeth of the top jockey wheel and the teeth of the largest cassette cog.
- This gap should typically be around 5-6mm, though it varies by manufacturer (SRAM and Shimano have different specifications). Turning the B-tension screw clockwise will move the derailleur away from the cassette, increasing the gap. Turning it counter-clockwise will move it closer, decreasing the gap.
- Adjust the screw to achieve the correct spacing. A properly set B-tension ensures the chain can move smoothly onto the largest cogs without rubbing or hesitating.
Quick-Fix Troubleshooting
Even with a perfect setup, you might encounter minor issues. Here's a quick guide to diagnose and solve common problems in real-time.
| Symptom | Likely Cause & Solution |
|---|---|
| Chain is slow to shift to a larger cog (easier gear). | Increase Cable Tension: The derailleur needs a stronger pull. Turn the barrel adjuster counter-clockwise in quarter-turn increments. |
| Chain is slow to shift to a smaller cog (harder gear). | Decrease Cable Tension: The derailleur spring is struggling. Turn the barrel adjuster clockwise. Also, check again for sticky or dirty cables. |
| Chain falls off the smallest cog toward the frame. | H-Limit Screw Too Loose: The outward limit is not set correctly. Turn the H-limit screw clockwise slightly to move the limit inward. |
| Chain falls off the largest cog into the spokes. | L-Limit Screw Too Loose: This is dangerous. The inward limit is not set. Turn the L-limit screw clockwise to move the limit outward. |
| Chain makes a rattling or clicking noise in multiple gears. | Indexing is Off: Your cable tension is not quite right. Use the barrel adjuster for fine-tuning. B-Tension Incorrect: Check the jockey wheel gap. |
The Front Derailleur
While this guide focuses on how to adjust a rear derailleur, it's helpful to know that its front counterpart works on similar principles. The front derailleur moves the chain between your front chainrings and also has L- and H-limit screws to prevent the chain from dropping off, as well as cable tension adjustments for smooth shifting.
The key differences are that the front derailleur's position also involves setting its height above the chainrings and ensuring its cage is perfectly parallel to them. It's a slightly different process, but understanding the rear derailleur gives you a massive head start. For now, master the rear adjustment, as it's the one you'll use and fine-tune most often to keep your bike riding perfectly.
Frequently Asked Questions
Q: How often should I adjust my rear derailleur?
A: You should check your rear derailleur adjustment whenever you notice poor shifting performance. Most bikes need minor cable tension adjustments every few months of regular riding. A full adjustment is typically needed once or twice a year, or after any crash or impact that might have bent the derailleur hanger.
Q: What tools do I need to adjust my bicycle derailleur?
A: The basic tools you need are a Phillips head screwdriver, Allen keys (usually 4mm or 5mm), and a way to lift the rear wheel off the ground. A bike repair stand makes the job much easier, but you can also hang your bike or have someone hold it for you.
Q: Why does my chain keep falling off even after adjusting the limit screws?
A: If your chain still falls off after properly setting the limit screws, the most likely cause is a bent derailleur hanger. This small piece of metal must be perfectly straight for proper shifting. You'll need to have it straightened with a special tool or replaced entirely.
Q: Can I adjust my derailleur without removing the rear wheel?
A: Yes, you can adjust your derailleur with the wheel on the bike. You just need to lift the rear wheel off the ground so you can pedal and shift while making adjustments. This is actually the preferred method since it allows you to test the shifting in real-time.
Q: What's the difference between cable tension adjustment and indexing?
A: Cable tension adjustment and indexing are actually the same thing. Indexing refers to the process of fine-tuning the cable tension using the barrel adjuster so that each click of your shifter moves the chain precisely to the next gear. Proper indexing results in crisp, accurate shifts throughout your entire gear range.


Leave a comment