


Bike Mirrors Near Me That Fit Any Handlebar or Helmet
A Must-Have Safety Tool
A bike mirror isn't just a nice-to-have accessory. It's a basic piece of safety gear that every cyclist should use. For people who ride to work, ride for fun, or use e-bikes, it changes how aware and confident you feel on the road.
- Constant Awareness: A mirror cuts down on how often you need to turn your head and lose balance. Just a quick look with your eyes tells you what's behind you, so you can keep watching the road ahead. This follows federal safety guidelines for bicyclists, which stress how important it is to always know what's around you.
- Easy Traffic Watching: With a mirror, you can track cars coming up behind you, see other cyclists following you, or spot someone about to cross the street. This lets you predict what might happen and make safer choices without any sudden moves.
- Safer Group Riding: When you ride with friends, a mirror helps you watch the group. You can see if someone is falling behind or if gaps are forming, all without yelling or turning around completely.
Traffic safety data shows that staying on a steady path and knowing what's around you prevents most common bike accidents. A mirror is the best tool for staying aware.
Handlebar vs. Helmet Mirrors
Your first big choice is between a mirror that goes on your bike or one that goes on you. Each type has clear benefits and works better for different riders and bikes. Knowing these differences helps you find what works for your needs.
| Feature | Handlebar Mirrors | Helmet/Glasses Mirrors |
|---|---|---|
| Field of View | Fixed, larger mirror surface provides a clear, consistent view of the lane behind you. | Dynamic and vast; you can see anywhere you turn your head, including blind spots. |
| Stability | Generally very stable, but can be affected by road vibrations on rough surfaces. | Immune to road vibration, but image stability depends on how still you keep your head. |
| Ease of Installation | Simple clamp-on or bar-end plug installation. Can be done in minutes. | Attaches via adhesive pads or clips. Very quick, but adhesive requires a clean, flat surface. |
| Vulnerability | More exposed to damage in a fall or when leaning the bike against a wall. | Protected from bike falls. Moves with you, so it's less likely to get knocked. |
| Best For | Commuters, e-bike riders, and those who prefer a "set it and forget it" view. | Road cyclists, city riders needing to scan complex intersections, and anyone who rides multiple ebikes. |
Handlebar-Mounted Mirrors
These are the reliable workhorses of the cycling world. They usually come in two styles: clamp-on models that attach to an open spot on your handlebar, and bar-end models that plug right into the open end of your grips.
- Pros: The bigger mirror gives you a wide, easy-to-read view that feels like a car's side mirror. Once you set it up, the view stays the same and works reliably without any thought or effort while you ride. They are solid, dependable, and great for riders who want a simple solution that works.
- Cons: Since they stay in one position, they have a set blind spot. They can shake from road bumps, which sometimes makes the image blurry. Because they stick out, they're the part most likely to get damaged if your bike falls over or you squeeze through a tight space.
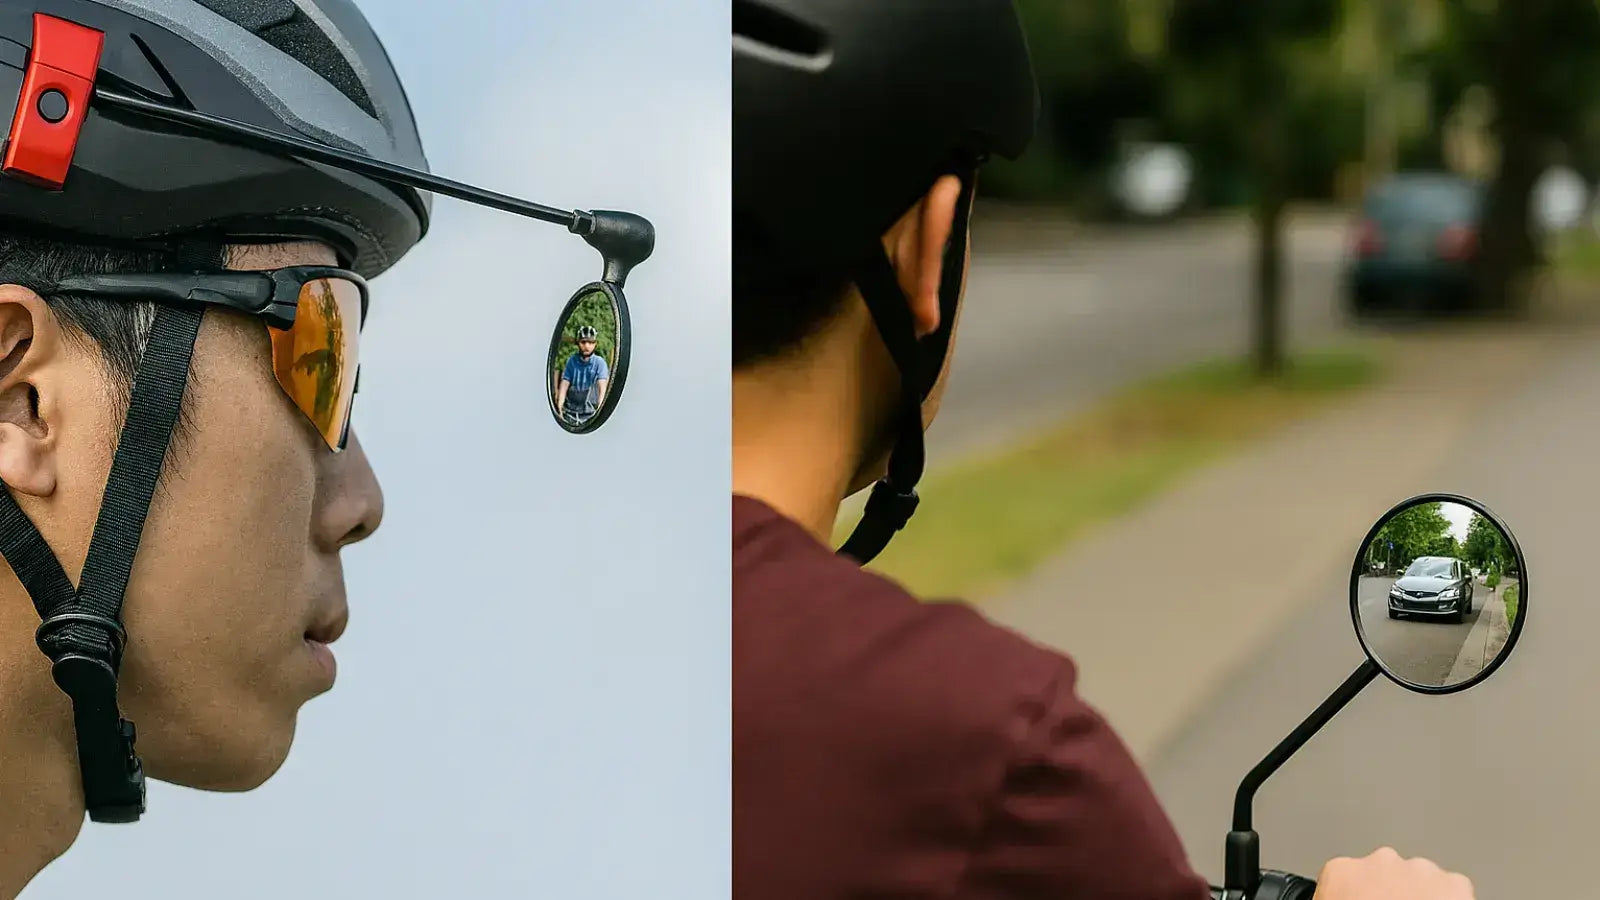
Helmet or Glasses-Mounted Mirrors
This style gives you a heads-up display experience by putting a small mirror on a short arm attached to your helmet or glasses.
- Pros: You can see everywhere behind you. A small turn of your head lets you scan the whole road behind you, check other lanes, and get rid of all blind spots completely. Since it attaches to you, not the bike, road bumps don't affect it and you can use it on any bike you own.
- Cons: It takes time to learn how to use it well. It can be distracting at first, and some riders think they look silly wearing one. The mirror is much smaller, so you need to adjust it more carefully and train your eye to use it well.
When we first tried a helmet mirror, it took several rides to train our eyes to look at the right spot. But once we learned how to use it, being able to quickly scan everything behind us by turning our head slightly became very valuable, especially in busy city traffic.
The Compatibility Checklist
Nothing is more annoying than buying something that doesn't fit. Before you go to a bike mirror shop near me or click "buy" online, go through this simple checklist. This will save you time, money, and the hassle of returning something.
For Handlebar Mirrors
Follow these three steps to make sure it fits perfectly on your handlebars.
Step 1: Measure Your Handlebar Width. Most mirrors clamp around the handlebar itself. You need to know how wide it is where you plan to mount it. The three standard sizes are 22.2mm (most flat/MTB bars), 25.4mm, and 31.8mm (the thicker middle section). Use a measuring tool for an exact number, or wrap paper around the bar, mark it, and measure that. Most mirror clamps can adjust but only within a certain range.
Step 2: Check Your Component Space. Look at your handlebars. Is there a clear, empty section of tube for a clamp-on mirror to attach to? Or are your grips, brake levers, and shifters crowded together? If space is tight, a bar-end mirror works better. For those, check if your handlebar grips have a removable plastic end cap. If they do, a bar-end mirror will plug right in.
Step 3: Think About Your Bar Type.
- Flat or Riser Bars: Found on hybrids, mountain bikes and commuter bikes. These work with almost all clamp-on and bar-end mirrors.
- Drop Bars: Found on road and gravel bikes. These are trickier. The brake/shifter hoods and handlebar tape leave little room for clamps. The best options are bar-end mirrors made for drop bars or special models that work with the brake hood.
For Helmet Mirrors
Here, compatibility depends on your helmet and eyewear, not your bike.
Step 1: Look at Your Helmet's Vents. Most helmet mirrors attach with strong sticky pads. For this to work, you need a fairly flat, smooth surface on the side or front edge of your helmet. Look at your helmet's design. Is it covered in sharp angles and deep vents, or is there a solid spot for the mount to stick securely?
Step 2: Think About Your Eyewear. If you want a glasses-mounted mirror, check the arms of your cycling sunglasses. They need to be strong enough to support the small weight and clamp of the mirror without slipping or feeling unbalanced. Very thin, flexible wire arms might not work well.
Local vs. Online Shopping
Now that you know what to look for, where should you buy it? The answer to "where are the best bike mirrors near me?" depends on what matters most to you.
Visiting a Local Bike Shop
Going to a physical store offers special advantages that work great for some buyers.
- Expert Advice: A good mechanic can look at your specific bike and helmet and give you an instant, accurate recommendation.
- Hands-On Feel: You can see the actual size of the mirror, judge how well it's made, and test how the adjustment works in person.
- Installation Help: Many shops will install the mirror for you, often for free or a very small fee, making sure it's done right.
- Support Local Business: You're investing in the local cycling community and keeping a valuable resource in your neighborhood.
Shopping for a Mirror Online
Online stores offer a different set of benefits, perfect for other types of buyers.
- Wider Selection: You get access to dozens of brands and specialized models that a local shop could never stock.
- Better Pricing: It's easy to compare prices across multiple stores to find the best deal.
- User Reviews: You can use the real-world experience of hundreds of other cyclists to learn about how long a product lasts and how well it performs.
- Special Products: The internet is the best place to find unique solutions for unusual bikes like recumbents or those with odd handlebars.
Our Recommendation
For the best of both approaches, use a mixed strategy. Start by using our compatibility checklist at home. Then, visit a local bike mirror shop near me to see the different types in person and get a feel for what you like. If they have the perfect model, buy it there. If you need a specialized model they don't carry, you can then confidently order it online, knowing exactly what you're getting.

Installation and Best Practices
A mirror only works if it's installed and adjusted correctly. Taking a few minutes to get this right will help on every ride.
A Quick Installation Guide
For Handlebar Mirrors:
- Choose your mounting spot (clamp-on) or remove the end cap from your grip (bar-end).
- Attach the mirror to the handlebar. For clamp-on models, we recommend loosely tightening the clamp at first. This lets you make small adjustments on your first ride before locking it into its final position.
- For bar-end models, simply push the plug firmly into the end of the handlebar until it feels secure.
For Helmet Mirrors:
- Clean the chosen spot on your helmet thoroughly with an alcohol wipe so the sticky pad gets a strong bond.
- Peel the backing from the sticky pad and press it firmly onto the helmet.
- Hold it in place for 30-60 seconds. Most adhesives take 24 hours to fully set, so it's best to let it sit overnight before your first ride.
The Art of Adjustment
Getting the adjustment right is critical. Your goal is to get a clear view of the lane directly behind you and part of the next lane with just a quick look, not a full turn of your head.
- Get on your bike and sit in your normal, relaxed riding position. Adjusting the mirror while standing next to the bike will give you the wrong viewing angle.
- Angle the mirror so that your arm and shoulder take up only a small part of the inside edge. The rest of the mirror should show the road.
- Fine-tune the angle until you can clearly see approaching traffic. A well-adjusted mirror should feel like a natural part of your vision, giving you important information without being distracting.
FAQ
1. Q: Can I use a bike mirror in the rain?
A: Yes, most bike mirrors are designed to handle rain and wet conditions. However, water droplets on the mirror surface can reduce visibility, just like on a car mirror. Wipe it clean when possible for the best view.
2. Q: How do I know if my handlebar diameter is compatible with a clamp-on mirror?
A: Measure your handlebar diameter where you plan to mount the mirror. Most clamp-on mirrors fit 22.2mm (standard flat bars) or 31.8mm (oversized bars). Check the product specifications before buying to ensure compatibility.
3. Q: Will a helmet mirror make me look weird while cycling?
A: While helmet mirrors have a distinctive look, safety should be your top priority. Many experienced cyclists use them, and most people get used to the appearance quickly. The safety benefits far outweigh any style concerns.
4. Q: How often should I adjust my bike mirror?
A: Check your mirror adjustment at the start of each ride, especially if you share your bike or helmet with others. Over time, vibrations and regular use can cause small shifts in position that affect the viewing angle.
5. Q: Can I install a bike mirror myself, or do I need professional help?
A: Most bike mirrors are designed for easy self-installation and come with clear instructions. Handlebar mirrors typically require no tools, while helmet mirrors just need a clean surface. However, if you're unsure, any local bike shop can install it quickly and correctly.


Leave a comment