E Bike with Hydraulic Brakes: End Squeaky Noise Forever
Why Your Current Brakes Are Letting You Down
That smooth, quiet ride on your e-bike feels amazing. But then you hit the brakes and hear that awful squeal. The peace gets broken by grinding sounds or the scary feeling that you're not stopping fast enough. This problem happens to many e-bike riders.
Common brake problems include weak stopping power when it rains, tired hands on long hills, and always having to make small fixes. Your frustration makes sense. E-bikes are heavier and faster than regular bikes, so they need better brakes. This guide will show you how to upgrade to an e-bike with hydraulic brakes. We'll explain the differences between brake types and detail the huge benefits of hydraulic systems. You'll learn about the upgrade process and what to look for when buying a new e-bike. It's one of the best improvements you can make for safety and riding fun.
Understanding the Problem
The squealing and weak braking aren't random issues. They often come from the mechanical disc brakes found on many basic and mid-level e-bikes.
How Mechanical Disc Brakes Work
Think of a mechanical disc brake like a simple clamp operated by a rope. When you squeeze the brake lever, you pull a steel cable. This cable runs along your frame and pulls on a small arm on the brake part, which pushes a brake pad against the metal disc on your wheel. It's a simple system that bikes have used for many years.
Problems With E-bikes
This design has weak points that get worse with heavy e-bikes.
Cable Stretch and Dirt: The steel cable causes the biggest problems. Over time, it stretches and makes the lever feel mushy. You have to pull the lever further to get the same stopping power. Dirt and water get into the cable housing, making the brakes feel slow and weak.
Uneven Pad Wear: Most mechanical brake parts only have one moving piece. This means only one brake pad pushes toward the disc. It shoves the disc sideways until it touches the fixed pad on the other side. This uneven force can make the disc bend, causing that terrible squealing sound. It also makes the pads wear out unevenly, so you need to adjust them more often.
The E-bike Problem: An e-bike can weigh 20-40 pounds more than a regular bike. When you add your weight and the higher speeds that e-bikes allow, the brakes work much harder. Mechanical brakes weren't made to handle that much weight and speed all the time, especially on long hills or in wet weather.
How Hydraulic Brakes Change Everything
Hydraulic brakes solve these problems by replacing the steel cable with a sealed system filled with fluid. They give you more power, control, and steady performance than mechanical brakes can match.
The Science Behind Hydraulic Brakes
Hydraulic e-bike brakes work like car brakes. They use a closed system based on a scientific rule that says pressure applied to fluid in a closed container spreads equally through the fluid.
When you squeeze the brake lever, you push a small part in the main cylinder. This part pressurizes special oil in the brake hose. The pressure travels instantly through the hose to the brake part at the wheel, where it acts on much larger parts. These parts, located on both sides of the brake, move at the same time to clamp the brake pads evenly and powerfully onto the disc.
Comparing the Two Systems
The difference in real performance is huge. A quick comparison shows the clear advantages.
| Feature | Mechanical Disc Brakes | Hydraulic Disc Brakes |
|---|---|---|
| Stopping Power | Good, but requires strong hand force. | Excellent, requires minimal hand force. |
| Control | Often "on/off" feel. Harder to control. | Great. Allows for fine control of braking power. |
| Consistency | Changes with weather; cable problems. | Very steady in all weather conditions. |
| Maintenance | Frequent cable adjustments. | Self-adjusting for pad wear. Needs fluid change every 1-2 years. |
| Cost | Lower starting cost. | Higher starting cost. |
Perfect Control
While strong stopping power is great, the real magic of hydraulic brakes is control. This means you can precisely control how much braking force you use. Think of it as the difference between a light switch and a dimmer switch. Mechanical brakes feel like a light switch: they're either on or off, making it easy to lock up a wheel by accident.
Hydraulic brakes work like a dimmer switch. With just one or two fingers on the lever, you can lightly touch the brakes to slow down a little before a turn, gently slow down in traffic, or bring your heavy e-bike to a full, controlled stop without skidding. This level of fine control makes you much safer and more confident, especially on wet roads, loose gravel, or steep hills where keeping traction matters most.
Your Path to Better Brakes
Ready to upgrade? The good news is that adding hydraulic brakes to your current e-bike is one of the easiest and most rewarding projects you can do yourself. In one afternoon, you can completely change how your bike performs.
Can You Upgrade Your E-bike?
If your e-bike already has disc brakes of any kind, the answer is almost always yes. The key is to check the mounting points on your frame and fork. The bike industry has made these standard, and you'll almost always find one of two types: Post Mount or IS Mount.
- Post Mount: Looks like two threaded posts sticking straight out from the frame or fork. The brake part bolts directly onto them.
- IS Mount: Looks like two unthreaded tabs running parallel to the wheel. The brake part bolts to an adapter, which then bolts to the frame.
Almost all modern hydraulic brake kits are Post Mount but come with adapters to fit IS Mounts. Just identify what you have and make sure you get the right adapter if needed.
Step-by-Step Upgrade Guide
This guide assumes you've bought a "pre-bled" hydraulic brake kit, which includes the lever, hose, and brake part already put together and filled with fluid. This is the easiest way to do the upgrade.
-
Get Your Tools and Parts: You'll need your new pre-bled hydraulic brake set, metric Allen keys, a torque wrench (highly recommended for safety parts), and zip ties or a cable cutter.
-
Remove the Old System: Carefully unbolt the old brake parts from the frame and fork. Then, unbolt the old brake levers from the handlebar. Cut any zip ties holding the brake cable to the frame and pull the entire system off the bike. Pro-Tip: Before you remove everything, take a quick photo of how the old cable was attached along the frame. This will guide you for the new hose.
-
Install the New Levers and Brake Parts: Loosely attach the new hydraulic levers to your handlebar in a comfortable position. Then, loosely bolt the new brake parts to the mounting points on your frame and fork. Don't tighten them fully yet.
-
Route the Hydraulic Hose: Carefully guide the new hydraulic hose along the frame, following the path of the old cable. Use new zip ties to attach it neatly to the frame's cable guides. Make sure the hose has enough slack to allow the handlebars to turn freely without being stretched or kinked.
-
Tighten and Align the Brake Part: This is the most important trick for silent, rub-free operation. With the brake part bolts still loose enough for it to wiggle slightly, squeeze the brake lever hard and hold it. This action perfectly centers the brake part over the disc. While still holding the lever tight, use your other hand to evenly tighten the two mounting bolts to the maker's recommended torque. Release the lever and spin the wheel. It should spin freely with no rubbing.
-
Trim Hoses if Needed: Many kits come with hoses long enough for any bike. If the extra hose is too much to manage, it can be trimmed and re-bled. However, this is an advanced step that requires a special bleed kit and some practice. If you're not confident, a local bike shop can do this for you quickly and cheaply.
-
Break In Your New Brakes: This final step is vital for getting full power. Find a safe, open area. Get the bike up to a moderate speed (around 10-15 mph) and then apply one brake firmly and steadily until you slow to a walking pace (don't stop completely or lock the wheel). Repeat this 15-20 times for each brake. This process puts a thin, even layer of pad material onto the disc, which greatly increases friction and ensures quiet, powerful performance.
Do It Yourself vs. Professional Help
Doing the upgrade yourself feels great and saves money. However, brakes are your most important safety feature. If you're not good with tools or don't own the right equipment (especially a torque wrench), there's no shame in taking your bike and the new brake kit to a professional mechanic. They will make sure the job is done perfectly, giving you complete peace of mind.
Buying a Smart E-bike
If you're shopping for a new e-bike, knowing what to look for in an ebike braking system can save you from needing an upgrade later. The spec sheet tells you everything you need to know.
Look Beyond the Basic Label
Seeing "Hydraulic Disc Brakes" on a product page is a great start, but not all hydraulic systems work the same. A little more knowledge will help you spot a quality part package.
Important Spec Sheet Details
Watch for these signs of a well-built e-bike:
- Trusted Brands: Look for brake systems made by established part makers. Names like Shimano, SRAM, Tektro/TRP, and Magura all mean quality and reliability. If the brand isn't listed, it could be a generic, lower-performance system.
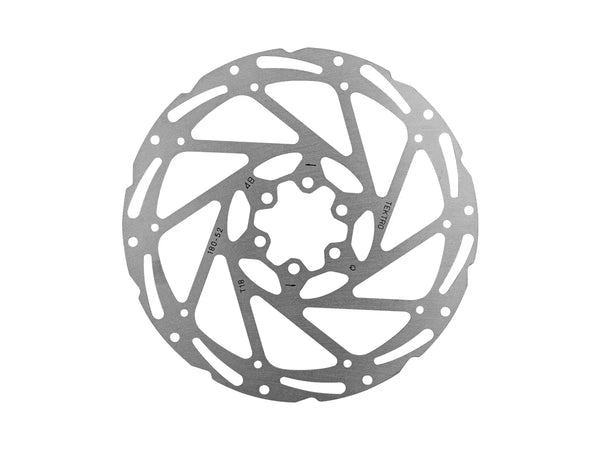
- Disc Size: Bigger is better for power and heat control. Discs are measured in millimeters. While 160mm discs are common, seeing 180mm or even 203mm discs, especially on the front wheel, shows that the maker has focused on braking performance for the bike's weight and intended use. This matters most for heavy cargo e-bikes, tandem e-bikes, or electric mountain bikes.
- Number of Pistons: Most commuter e-bikes use 2-piston brake parts, which are a fantastic upgrade over mechanical brakes. However, more powerful e-bikes, particularly electric mountain bikes, will often have 4-piston brake parts. These offer an even larger brake pad surface and more clamping force for the most demanding situations.
- Overall Quality: A good brake system shows the overall quality of the bike. Makers who invest in good brakes are less likely to cut corners elsewhere. This shows when you look at roundups of many of the best-rated e-bikes for 2025, where top-tier models consistently have hydraulic systems from trusted brands.

The Bottom Line
Whether you're fighting with your current brakes or shopping for a new ride, choosing an motorized ebike with hydraulic brakes is a decision you will never regret. The jump in safety, control, and confidence changes everything. Getting rid of constant adjustments and annoying noises removes the biggest frustrations of e-bike ownership, leaving you with nothing but the quiet hum of the motor and the joy of the ride. It is, without a doubt, one of the most worthwhile investments you can make in your cycling experience.
Frequently Asked Questions
1. Q: How much does it cost to upgrade to hydraulic brakes on my existing e-bike?
A: A quality hydraulic brake upgrade kit typically costs between $150-400 for both front and rear brakes. Professional installation adds another $100-200 if you choose not to do it yourself.
2. Q: How often do hydraulic brakes need maintenance compared to mechanical brakes?
A: Hydraulic brakes need much less frequent maintenance. While mechanical brakes need cable adjustments every few weeks, hydraulic brakes only need fluid bleeding every 1-2 years and pad replacement as needed.
3. Q: Can I upgrade just the front brake to hydraulic and keep the rear mechanical?
A: Yes, you can mix brake types, though it's not ideal. The different feel between front and rear brakes can affect your braking control. Most riders prefer to upgrade both brakes at the same time for consistent performance.
4. Q: Will hydraulic brakes work well in winter or wet weather?
A: Hydraulic brakes perform much better than mechanical brakes in all weather conditions. They maintain consistent stopping power in rain, snow, and cold temperatures because the sealed fluid system isn't affected by water or dirt like cables are.
5. Q: How do I know when my hydraulic brake pads need replacement?
A: Most hydraulic brake pads have wear indicators - small grooves that disappear when the pad is worn out. You'll also notice reduced stopping power and may hear metal-on-metal grinding if the pads are completely worn. Most pads last 1,000-3,000 miles depending on riding conditions.


Leave a comment