


Best Bike Rear Rack with Bag: Complete Guide 2025
Getting rid of the sweaty backpack is a big step for any bike commuter. That moment when you realize there's a better way to carry your laptop, lunch, and change of clothes than showing up at work with a wet shirt changes everything. The answer is simple: a rear bike rack with bag. This setup gives you a more comfortable, stable, and fun ride.
But looking at all the racks, panniers, trunk bags, and mounting systems can feel overwhelming. Making the wrong choice leads to problems with parts that don't work together or gear that doesn't fit what you need every day. This guide takes away the guesswork. We'll show you everything you need to know, from checking if parts work with your bike to picking a bag that matches how you live. Our goal is to help you find the perfect carrying solution and buy the right gear the first time, giving you freedom from a sweaty back for good.
Step 1: Define Your Commute
Before you look at any product, the most important step is understanding what you really need. A setup that works great for a 15-minute ride on flat roads is different from what you need for a 45-minute hilly trip. Asking yourself a few key questions first will help you make the right choice and stop you from buying gear that's either not enough or too much.
Ask yourself:
- Distance and Terrain: How long is your ride? Is it flat, or will you climb hills where weight and balance matter more?
- Cargo Type: What do you absolutely need to carry? Are you bringing a 15-inch laptop, a change of clothes, and shoes? Or just a tablet, a lock, and your lunch? Do you plan to buy groceries on the way home? The size and shape of what you carry matters.
- Weather Conditions: Do you ride when it rains? If you live where it gets wet a lot, fully waterproof materials are something you must have, not just something nice to have.
- Off-Bike Use: What happens when you reach your destination? Do you need to carry your bag easily through an office building, into a classroom, or around a store? A good shoulder strap or backpack option could be very important.
To help you see what you need, we've made the Commuter Needs Matrix. Find the profile that matches your routine best to get a starting point for size and key features.
| Commuter Profile | Typical Load | Recommended Capacity | Key Feature Focus |
|---|---|---|---|
| The Minimalist | Laptop, charger, notebook, small lunch | 10-15 Liters | Slim profile, professional look, easy on/off |
| The All-Weather Pro | Laptop, clothes, shoes, tools, lunch | 20-25 Liters (or more) | 100% Waterproof (roll-top), secure mounting |
| The Errand Runner | Groceries, various items, lock | 15-30+ Liters (expandable) | Wide opening, stable base, shoulder strap |
| The Student | Books, laptop, water bottle, jacket | 15-25 Liters | Multiple compartments, durability, off-bike comfort |
Step 2: Choose Your Rack
The rack holds up your whole carrying system. Picking the right one comes down to three things: whether it works with your bike, what it's made of, and how much weight it can safely hold. Getting this part right is key for a safe and stable ride.

Bike Compatibility
The first thing to check is how a rack will attach to your bike. Most bike frames made for commuting or touring have built-in mounting points called eyelets. You'll usually find these in two places:
1. Near the rear axle on the frame's dropouts.
2. On the seat stays (the tubes running from the seat down to the rear axle).
If your bike has these eyelets, you can use a standard rear rack, which is the most secure and stable choice. As detailed in comprehensive reviews of common styles of pannier racks, checking your frame's mounting points is always the first step.
What if your bike doesn't have eyelets? Don't worry, you still have choices:
- P-Clamps: These are coated metal clamps that wrap around your bike's seat stays to create a mounting point.
- Seat Post Clamps with Rack Mounts: You can replace your current seat post clamp with one that has built-in threaded holes for attaching a rack's upper stays.
- Axle-Mounting Racks: Some modern racks, like those from Old Man Mountain, attach directly to the bike's thru-axle or quick-release skewer, avoiding the need for frame eyelets completely.
While these solutions work well, P-clamps and seat post clamps usually can't hold as much weight as racks bolted directly to frame eyelets.
Disc Brake Considerations
The rise of disc brakes on commuter bikes created a common problem with parts working together. The brake caliper, located on the seat stay, can often get in the way of a standard rack's support leg.
If you have disc brakes, you need a disc-compatible rack. These racks have an offset lower leg or a "dog leg" shape that bends outward to give clearance around the brake caliper. Trying to force a non-disc rack to fit can be frustrating and unsafe. Always check for this feature if your bike has disc brakes.
Material and Capacity
Rear racks are usually made from one of two materials: aluminum or steel.
- Aluminum: This is the most popular choice for commuting. Aluminum racks are lightweight, strong enough for daily loads, and naturally fight rust. A typical aluminum rack can handle 40-55 lbs (18-25 kg), which is more than enough for most commuters. The popular Topeak Explorer rack, for example, is made of hollow aluminum and is praised for being lightweight yet stable.
- Steel (Chromoly): Steel racks are heavier but very tough and strong. They are the standard for heavy-duty bike touring where riders might carry 70 lbs (32 kg) or more. For a daily commute, a steel rack is usually more than you need unless you plan on carrying very heavy or bulky items.
For most commuters carrying a laptop, change of clothes, and daily basics, an aluminum rack with a load capacity of 40 lbs (about 18 kg) gives the perfect balance of strength, weight, and cost.
Step 3: Find Your Bag
With your rack chosen, it's time to pick the bag that will sit on it. The main types are panniers, trunk bags, and convertible hybrids. The right choice for you depends completely on the needs you found in Step 1.
Panniers: The Workhorse
Panniers are bags that mount on the sides of the rear rack, either one or two at a time. They are the top choice for anyone who needs to carry a lot of gear.
- Best For: Commuters carrying bigger loads like a full set of clothes, shoes, and a laptop. The side-mounted position keeps the center of gravity low, which makes the bike feel more stable than it would with a top-heavy load. Many models, like the classic Ortlieb Back-Roller, come with office-friendly features and look professional.
- Things to Think About: Even if you only need one, buying a pair can be useful for balancing heavy loads or for future grocery runs. The main thing to check is heel clearance—make sure your heel doesn't hit the front of the bag as you pedal. Most panniers can be adjusted to prevent this.
Trunk Bags: The Sleek Option
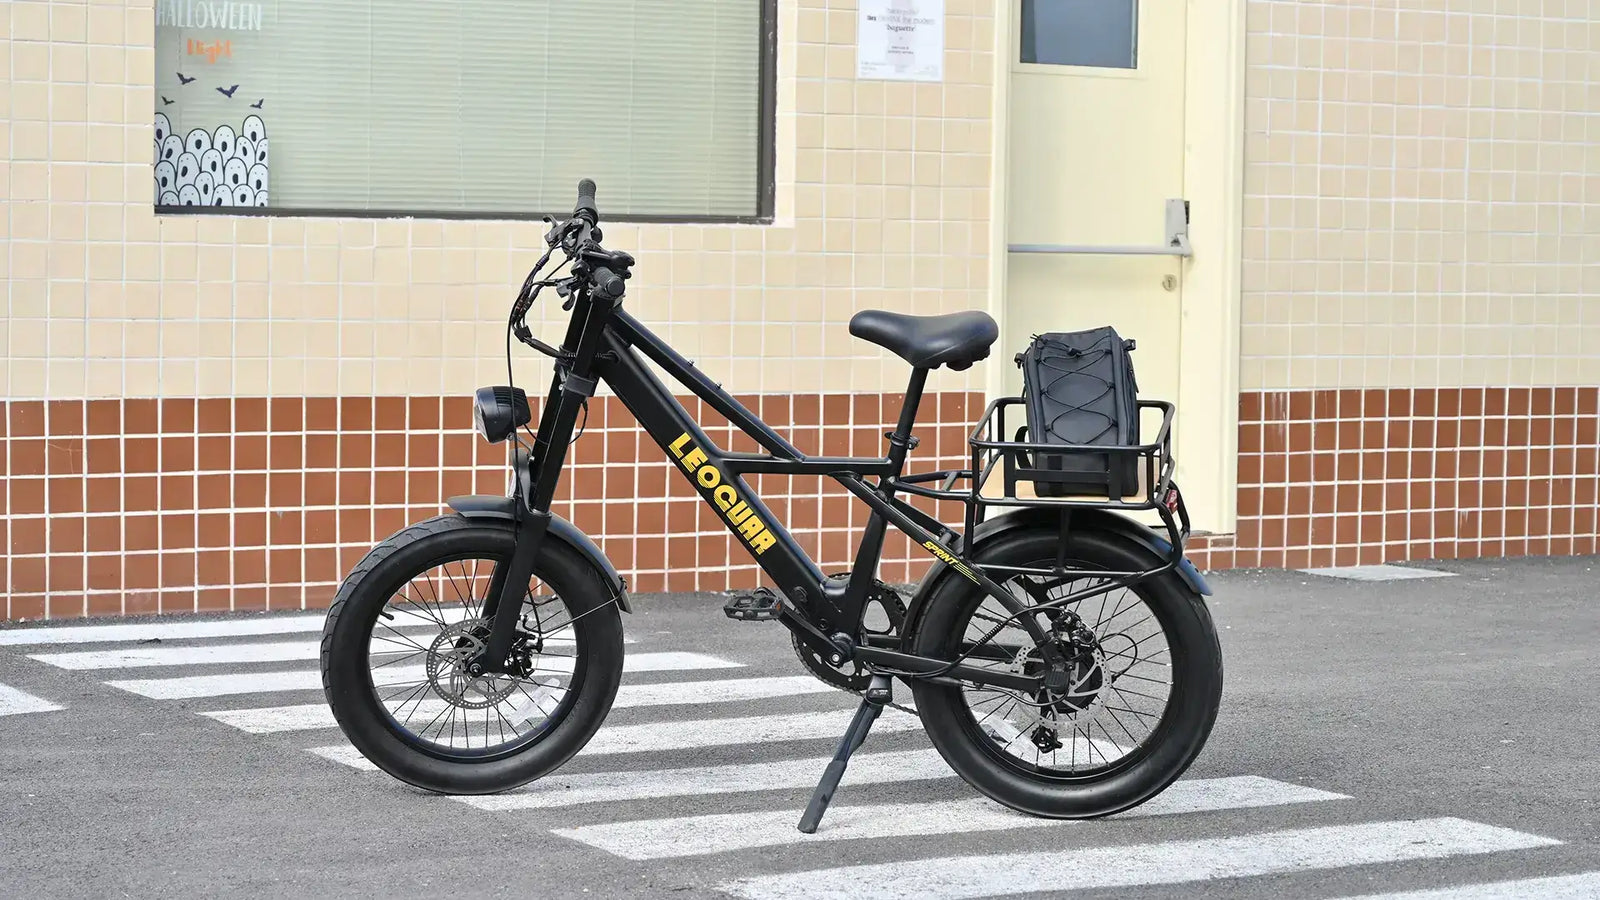
A trunk bag is a smaller, more compact bag that sits directly on top of the rack platform.
- Best For: The minimalist commuter who carries a lighter load (like lunch, a book, a light jacket, and tools). They cut through the air well, are easy to reach, and often have a sleek, low-profile look. Many, like the Topeak MTX TrunkBag, have expandable side pockets that can fold out to act like mini-panniers when you need a little extra space.
- Things to Think About: Their capacity is naturally smaller than most panniers. Because the weight sits higher up, a heavily loaded trunk bag can make the bike feel slightly less stable than panniers.
Convertible Bags: The Hybrid
These clever bags work for maximum flexibility. They attach to the rack like a pannier or trunk bag but include hidden straps that let them quickly turn into a working backpack or messenger bag.
- Best For: Commuters who need excellent off-bike portability. If you have a long walk from the bike rack to your desk or classroom, being able to throw the bag on your back is very convenient.
- Things to Think About: The conversion mechanism (stowable straps, zippers, and padding) adds weight and complexity. The backpack harness is often less comfortable and supportive than a dedicated hiking or commuting backpack, so it's best for shorter walks rather than all-day wear.

Step 4: Nail The Perfect Match
A great rack and a great bag are useless if they don't work together. The connection between the two—the mounting system—is an important detail that is often overlooked. A secure connection is not just about convenience; it's about safety.
There are two main ideas when it comes to mounting systems: proprietary and universal.
- Proprietary Clip-On Systems: Brands like Topeak (MTX), Ibera (PakRak), and MIK have developed their own integrated systems. These feature a specific track or plate on the rack that matches a corresponding base on the bag. You simply slide the bag on until it clicks into place. The main pro is that they are very fast, stable, and easy to use. The con is that you are locked into that brand's system—a Topeak bag will only fit a Topeak rack.
- Universal Hook & Latch Systems: This is the most common system, perfected by brands like Ortlieb (QL series) and Arkel (Cam-Lock). These systems use a set of adjustable hooks that grip the top rail of the rack and a lower latch or anchor that secures the bottom of the bag to prevent it from swinging. The main advantage is flexibility; these bags can be adjusted to fit nearly any rack from any brand, regardless of tube diameter. The initial setup might take a few minutes to get the hooks spaced correctly, but after that, they go on and off in seconds.
- Simple Straps (Velcro/Buckle): Some entry-level trunk bags and panniers use simple Velcro or buckle straps to wrap around the rack. While this system works with everything, it is the least secure and the slowest to attach and detach, making it less ideal for daily commuting.
For a safe and worry-free ride, having a secure connection is very important, a point often emphasized by cycling advocacy groups like the League of American Bicyclists. A bag that rattles or shifts can be distracting and unsafe, so investing in a quality mounting system is always worth it.
Step 5: Don't Forget The Details
The difference between a good setup and a great one often comes down to the small, thoughtful features that improve your daily experience. As you compare your final options, look for these quality-of-life details.
- Waterproofing: Don't settle for "water-resistant" if you ride in the rain. Look for bags with welded seams and a roll-top closure, which are the gold standard for keeping contents bone-dry in a downpour. If the bag isn't fully waterproof, check if it includes a separate, high-visibility rain cover.
- Internal Organization: A giant, empty sack can be frustrating to dig through. Look for bags with internal organization, especially a padded and suspended laptop sleeve that protects your computer from vibrations and minor drops. Smaller zippered pockets are perfect for keys, a wallet, and tools.
- Off-Bike Carry Comfort: If you chose a pannier or trunk bag, how will you carry it? A padded, detachable shoulder strap is a must-have feature for any commuter. A sturdy, comfortable grab handle also makes a big difference.
- Visibility and Safety: Your bag is a large piece of real estate on your bike—make it count. Look for bags with generous reflective accents or logos to improve your visibility to drivers in low-light conditions. A dedicated loop for attaching a rear taillight is another essential safety feature.
- Ease of Use: How quickly can you get the bag on and off the rack? For daily commuting, a system that allows for one-handed attachment or release can save you a lot of time and hassle. Test the buckles, zippers, and mounting hardware to ensure they feel durable and easy to operate, even with gloves on.
Frequently Asked Questions
What's the difference between a pannier and a trunk bag?
Panniers mount on the sides of your bike rear rack with bag, while trunk bags sit on top of the rack platform. Panniers offer more storage space and better weight distribution, making your bike feel more stable. Trunk bags are more compact and aerodynamic, perfect for lighter loads and minimalist commuters.
Can I use any bag with any rack?
Not all bags work with all racks. Some brands like Topeak use proprietary mounting systems that only work with their own racks and bags. Universal hook and latch systems offer more flexibility and can fit most standard racks. Always check compatibility before buying.
How much weight can a rear bike rack with bag safely carry?
Most aluminum commuter racks can safely handle 40-55 lbs (18-25 kg), which is plenty for laptops, clothes, and daily essentials. Steel racks can carry more but are heavier. Always check your specific rack's weight limit and don't exceed it for safety reasons.
Do I need a waterproof bag for bike commuting?
If you ride in rainy conditions, yes. Look for bags with welded seams and roll-top closures rather than just "water-resistant" materials. Many bags also come with separate rain covers as an alternative. Keeping your electronics and clothes dry is worth the investment.
Will a rear rack and bag make my bike harder to ride?
A properly installed rear bike rack with bag actually improves your riding experience compared to a backpack. The weight sits lower and doesn't move with your body, making the bike more stable. You might notice slightly different handling when turning, but most riders adapt quickly and find it more comfortable.


Leave a comment