


Electric Bike Display & USB Charging: Smarter Rides
Riding an electric bike is different from regular cycling. It's not just about getting help from a motor; it's about stepping into a smarter, more connected way of riding. The parts that make this change possible are often right in front of you: the electric bike display and the built-in USB charging port. These are not just extras. They are the brain and power source of your modern ride, making your experience better through improved safety, amazing convenience, and strong connectivity.
They are no longer luxuries but must-have tools for any rider, from the daily commuter to the weekend adventurer. In this guide, we'll explore everything you need to know about your ebike's command center. We will break down every function of the display, explain the real-world benefits of having power on the go, and show you how to use these technologies for a safer, more efficient, and more enjoyable journey.
Your Ebike's Command Center
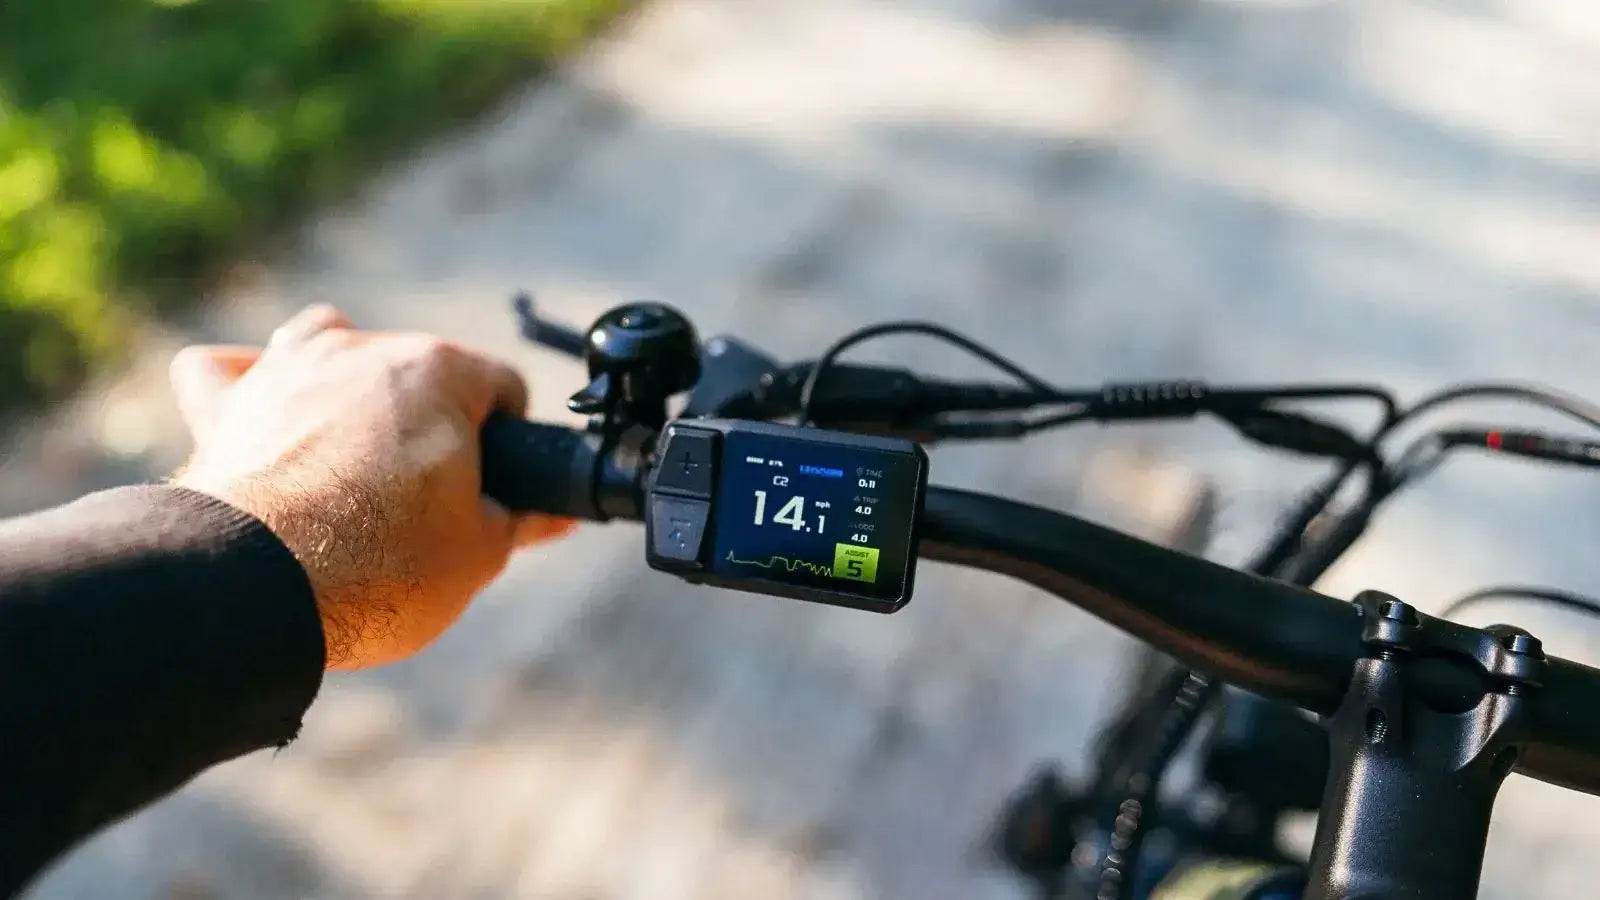
Think of your electric bike display as its cockpit or dashboard. It's the central hub where you get all important information about your bike's performance and status in real-time. This quick feedback is what changes your ride from a simple activity into an interactive experience, letting you make smarter decisions on the fly. Without it, you're basically riding blind, guessing about your battery life and power output.
Must-Have Metrics
Every ebike display, from the most basic to the most advanced, gives you a core set of data that is essential for any rider.
- Speedometer: This is the most familiar metric. Most displays show your current speed, but many also track your average speed over a trip and your maximum speed. This helps you pace yourself and understand your performance over different terrains.
- Battery Gauge: This is probably the single most critical piece of information. It's your fuel gauge, and it's the key to beating "range anxiety"—the fear of your battery dying mid-ride, leaving you with a heavy, unassisted bike. A clear, accurate battery gauge lets you manage your power use with confidence.
- Pedal Assist System (PAS) Level: This shows you which level of motor help you are currently using. As the main way you interact with the bike's motor, seeing the PAS level at a glance lets you easily switch between more power for hills and less power for flat areas to save energy.
- Odometer and Trip Meter: The odometer tracks the total distance your bike has ever traveled, which is useful for maintenance schedules. The trip meter tracks the distance of your current journey, perfect for following routes or tracking your daily commute.
Advanced Rider Data
For riders who want to dive deeper into their performance and efficiency, more advanced displays offer many additional data points.
- Watt Meter: This shows the motor's real-time power output in watts. It gives you a precise understanding of how much work the motor is doing, helping you learn how to ride more efficiently.
- Range Estimator: This is a game-changer. Instead of just showing a battery percentage, this function uses a computer program that considers your current battery level, PAS setting, and sometimes even your recent riding style to give you a changing estimate of your remaining mileage.
- Cadence (RPM): More common on performance-focused ebikes, a cadence sensor measures your pedaling speed in revolutions per minute. This helps you maintain the best pedaling rhythm for maximum efficiency and less strain on your knees.
- Clock and Ride Timer: Simple convenience features that are surprisingly useful. A clock saves you from pulling out your phone, and a ride timer helps you track how long you've been on the road.
Market trends and countless rider reviews confirm that a clear, easy-to-read display is a top factor influencing purchase decisions. As experts at Bicycling magazine note when reviewing top models, A large color display shows all your essential ride metrics, highlighting its importance in the overall quality of an ebike.
Types of Ebike Displays
Not all displays are created equal. The technology used directly impacts visibility, the amount of information shown, and the overall cost of the ebike. Understanding the differences will help you choose a bike that fits your needs and budget, or decide on a potential upgrade. The main difference is between simple LED indicators and more advanced LCD screens, which have now evolved into full-color, high-resolution hubs.
Choosing Your Viewport
Each display technology has its own set of pros and cons. We've broken them down in this simple table to help you compare.
| Feature | LED Display | LCD Display (Monochrome) | Color LCD/TFT Display |
|---|---|---|---|
| Visibility | Good in low light, poor in sun | Good in direct sun, often backlit | Excellent in all conditions, adjustable |
| Information | Basic indicators (lights for PAS/battery) | Detailed stats (speed, trip, odometer) | Rich data, graphics, menus |
| Power Consumption | Low | Moderate | Higher |
| Cost | Lowest | Standard | Premium |
| Best For | Budget-conscious riders, minimalists | All-around daily use, most commuters | Tech-savvy riders wanting the best |
Personalizing Your Ride
Many riders don't realize that their electric bike display is not just a readout—it's a gateway to customizing the bike's performance. Deep within the settings, often called "P-settings" or "P-codes," you can access the bike's brain and fine-tune settings to better suit your riding style and needs. While the interface varies between brands like Bafang, KT, or Bosch, the principles are often quite similar.
Unlocking Your Potential
Accessing these settings can feel like unlocking a secret level of your ebike. Here's a general guide, but remember to always check your user manual first, as the process can differ.
Disclaimer: Always check your ebike's manual before changing settings. Wrong adjustments can lead to poor performance, wrong readings, or even damage to the motor or controller.
- Accessing the Menu: A common method to enter the settings menu is to turn the display on and then press and hold the "+" and "-" buttons at the same time for a few seconds. This should bring up the first P-setting, usually labeled "P01".
- Common Adjustable Settings:
- Unit Change: One of the simplest yet most useful settings is switching the display units between Miles (MPH) and Kilometers (KM/H).
- Brightness Level: You can typically adjust the backlight brightness for better visibility during day or night riding.
- Wheel Size: This is a critical setting. You must input the correct wheel diameter (e.g., 26", 27.5", 29") for the speedometer and odometer to give accurate readings. A wrong setting will throw off all your speed and distance data.
- Speed Limit: This setting determines the maximum speed at which the motor will provide help. For law compliance, this is often locked by the manufacturer. On some models, it can be adjusted for private land or off-road use.
Disclaimer: You are responsible for knowing and following all local and federal ebike laws regarding speed limits.
For model-specific instructions or codes, riders often turn to online forums and communities for specific codes, which can be a valuable resource for crowd-sourced knowledge.
The Unsung Hero: USB Port
In our hyper-connected world, a dead phone battery can feel like a true emergency. It can mean losing your navigation, your primary communication tool, or your camera. This is where a small, often-overlooked feature on many modern ebikes becomes an absolute game-changer: the integrated USB in charger port. This port transforms your ebike's massive battery—which holds far more energy than any phone—into a personal power station on wheels. It's about more than just convenience; it's a critical feature for safety, exploration, and peace of mind.
More Than Just a Port
The power to stay powered up unlocks a new level of freedom and capability on every ride.
- Never Lose Your Way: Running a GPS navigation app like Google Maps or Komoot is a major battery drain on a smartphone. With the USB port, you can navigate unfamiliar trails or new city routes for hours without ever worrying about your phone dying.
- Safety and Communication: A charged phone is your lifeline in an emergency. Whether you need to call for help, check a weather alert, or let someone know you're running late, the USB port ensures you always have the power to do so.
- Capture Every Moment: Action cameras like GoPros are fantastic for documenting epic rides, but their batteries are notoriously short-lived. Plugging your camera directly into your ebike means you can record your entire adventure without missing a second.
- Power for Your Crew: Be the hero of your group ride. If a friend's phone is in the red, you have the power to help them out, keeping everyone connected and safe.
As technology evolves, we're seeing more bikes adopt the newer USB-C standard, moving on from the traditional USB-A. This is part of a larger tech trend, and understanding the bewildering world of USB-C charging helps to see why this is a positive step, as it offers faster and more versatile charging capabilities.
Building Your Smart Ecosystem
The true power of modern ebike technology is realized when you stop seeing the electric bike display and the USB in charger as separate features and start viewing them as components of a single, cohesive smart ecosystem. This system integrates your bike, your smartphone, and your favorite apps into a powerful on-bike tech hub.
Imagine planning a 50-mile weekend tour. We mount our smartphone on the handlebars, running a navigation app like Komoot to guide us through scenic backroads. The phone is plugged directly into the ebike's USB port, so its battery stays at 100% all day. Meanwhile, our ebike's display gives us a constant, clear reading of our speed, distance, and, most importantly, our remaining range. This allows us to confidently use a higher assist level on steep hills without fearing we'll run out of juice before we reach our destination. This is the smart ecosystem in action—a seamless integration of navigation, power, and performance data.

Your On-Bike Tech Hub
Creating this setup is simple and dramatically enhances the riding experience.
- The Right Phone Mount: The foundation of your tech hub is a secure, high-quality phone mount. Look for one that is robust, easy to operate, and offers vibration dampening to protect your phone's sensitive camera components on bumpy roads.
- Essential Apps for the Ride: Your smartphone becomes an extension of your ebike display. Use navigation apps like Strava, Komoot, or Google Maps for turn-by-turn directions. Fitness apps can track your heart rate and calories burned, while many ebike brands offer an awesome companion app that lets your phone track your bike's important stats, offering even deeper integration and ride analysis.
- Power Management: The USB port is the heart that keeps this entire ecosystem alive. It ensures that your phone, which is running multiple power-hungry apps, never becomes a liability. You get all the benefits of a large, smart screen for navigation without the associated battery anxiety.
The Future is Integrated
The technology in the ebike world is advancing at a breathtaking pace. What seems cutting-edge today will be standard tomorrow. The electric bike display and its related connectivity features are at the forefront of this evolution, moving from simple data readouts to fully integrated smart devices that will make our rides even safer, more secure, and more intuitive. Looking ahead, we can see several exciting trends emerging that will define the next generation of ebikes.
The Next Generation
- Deeper Smartphone Integration: We're moving beyond basic companion apps. The future will see full display mirroring, where your smartphone screen can be replicated on the ebike's display, or even eliminated entirely, with your phone becoming the primary display and control unit, securely docked on the handlebars.
- Built-in Anti-Theft and GPS: The display will become the hub for advanced security features. Integrated GPS modules will allow for live tracking of your bike's location from a smartphone app. Geofencing alerts will notify you if your bike moves without your permission, and remote motor-locking will render the bike useless to thieves.
- Advanced Onboard Diagnostics: Forget cryptic error codes. Future displays will provide detailed, plain-language diagnostic information. They might tell you "Rear brake sensor disconnected" instead of "Error 25." Some may even be able to communicate wirelessly with a bike shop's diagnostic tools for faster and more accurate servicing.
- Smart Safety Features: Displays will network with a suite of onboard sensors to actively improve safety. This could include automatic activation of headlights and taillights in low-light conditions, integrated brake lights that brighten when you decelerate, and even future integration with vehicle-to-everything (V2X) technology to provide collision warnings from approaching smart cars.
Frequently Asked Questions
Q: Can I upgrade my basic LED display to a more advanced LCD display?
A: In many cases, yes, but it depends on your ebike's controller compatibility. Check with your manufacturer or a qualified ebike technician to ensure the new display will work with your specific system before purchasing.
Q: How much power does the USB in charger use from my ebike battery?
A: The USB port typically draws very little power compared to your motor. Charging a smartphone usually consumes less than 1% of your total battery capacity, so it won't significantly impact your riding range.
Q: What should I do if my electric bike display shows an error code?
A: First, consult your user manual for the specific error code meaning. Try turning the system off and on again. If the error persists, contact your dealer or manufacturer, as it may indicate a sensor issue or controller problem that needs professional attention.
Q: Is it safe to use my smartphone as a display while riding?
A: Yes, when properly mounted and used responsibly. Use a secure phone mount, set up your navigation before riding, and only glance at the screen when safe to do so. The USB port keeps your phone charged so you don't have to worry about battery life during long rides.
Q: Can I access P-settings on all ebike displays?
A: Not all displays have user-accessible P-settings. Some manufacturers lock these settings to prevent tampering or ensure regulatory compliance. Check your manual or contact your dealer to learn what settings are available on your specific model.


Leave a comment