E Bike Brake Pads: Complete Replacement Guide
When to Change Pads: The Telltale Signs
Your e-bike's brakes are your most critical safety feature. E-bikes are heavier and travel at higher average speeds than traditional bicycles, so their braking systems are under much more stress. Knowing when to change your e bike brake pads is a basic skill that keeps you safe, makes your bike work better, and saves you money on expensive repairs later. This guide will walk you through every step, from finding wear to finishing a successful replacement.
Listen for the Signs
Your brakes often tell you about problems through sound. Pay attention to new or strange noises when you pull the brake levers.
- Grinding or Scraping: This is the most urgent warning sound. It often means the friction material on your brake pads has completely worn away, and you now have metal touching metal between the pad's backing plate and the brake rotor. Stop riding right away and replace the pads.
- High-Pitched Squealing: A loud, steady squeal can mean a few things. It might mean the pads are dirty with oil or grease, or they could be glazed over from heat. It can also be a sign that the pads are near the end of their life.
Feel the Difference
Changes in how your brake lever feels are a direct clue to the health of your brake pads.
- Spongy or Mushy Feel: If the lever feels soft and you have to pull it further than usual to get a response, your pads are likely worn thin. In hydraulic systems, this can also mean you need a brake bleed, but worn pads are a common cause.
- Reduced Stopping Power: If you notice it's taking longer to come to a stop, or you have to pull the lever with much more force, your pads are no longer giving enough friction.
The Visual Inspection
The most sure way to know if you need to replace your e bike brake pads is to look at them. You don't always need to remove the wheel for a quick check.
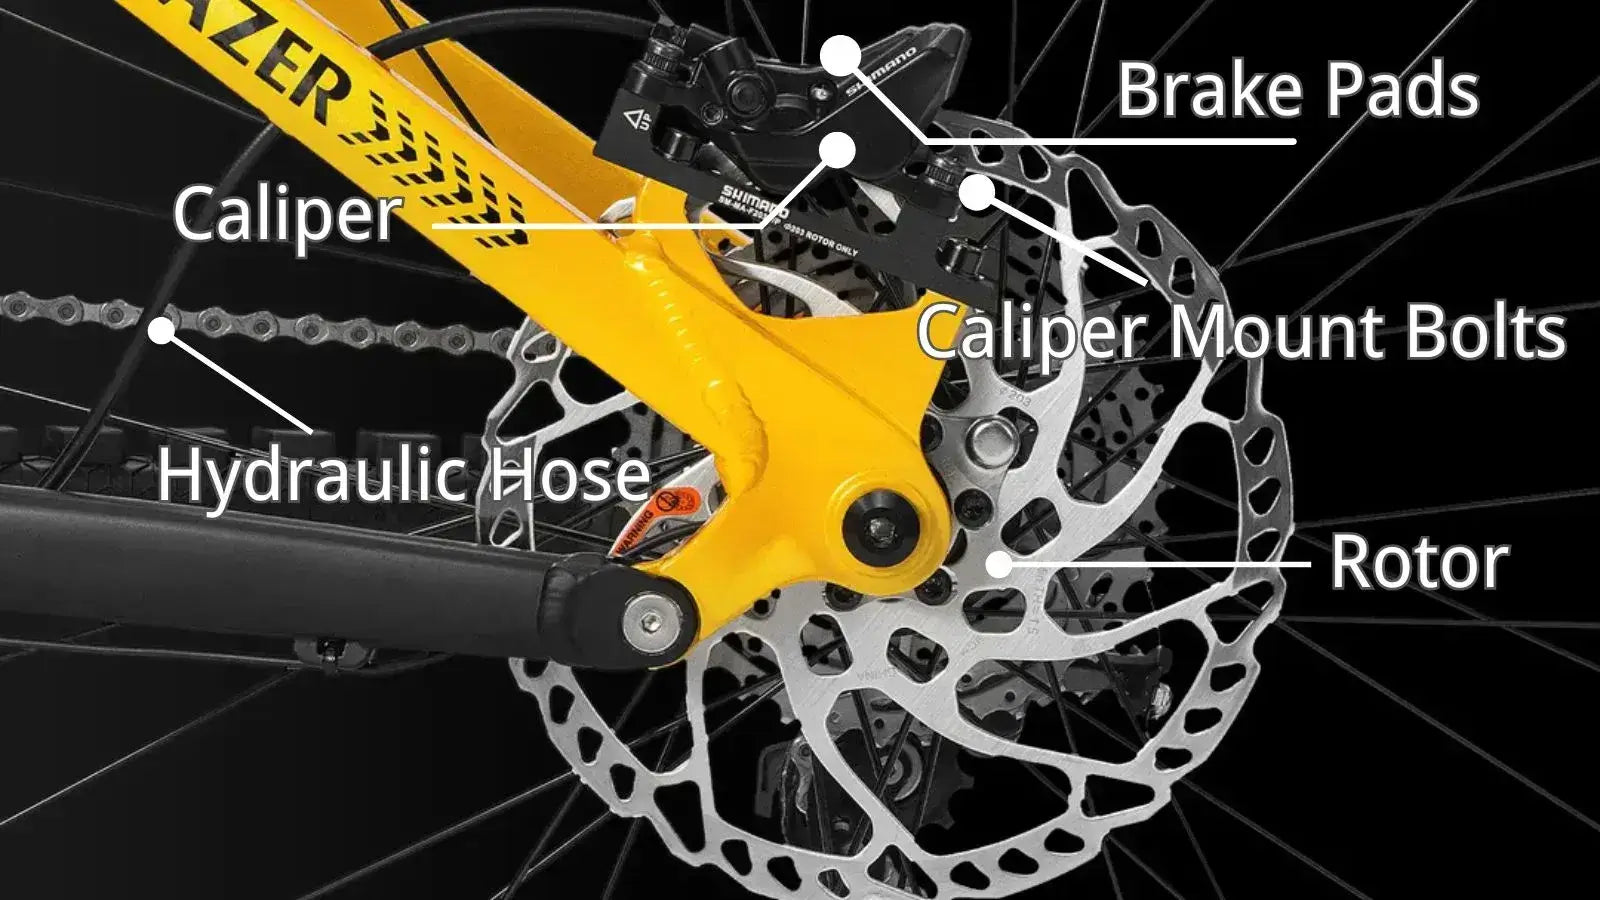
Position yourself so you can look directly into the brake caliper where it sits over the metal brake rotor. Use a flashlight if needed. You will see the two brake pads, one on each side of the rotor. The key is to check the thickness of the friction material left on the backing plate.
As a rule of thumb, you should replace your brake pads when the braking material is less than 1.5mm thick, which is roughly the thickness of a U.S. dime. If it's that thin or you can't see a clear difference between the pad material and the metal backing plate, it's time for a change.
Choosing the Right Pads: A Comparison
Selecting the correct e bike brake pads is important for performance. The choice depends on your brake system, your riding style, and the terrain you ride on.
Mechanical vs. Hydraulic Brakes
First, identify your brake type. It's simple:
- Mechanical Disc Brakes: These use a steel cable to pull the brake caliper's arm, squeezing the pads against the rotor. You will see a flexible steel cable running to the brake.
- Hydraulic Disc Brakes: These use a sealed system filled with hydraulic fluid. When you pull the lever, a piston pushes fluid through a hose to activate the caliper. The connection to the caliper will be a sealed, rigid hose.
Both systems use similar types of brake pads, but the shape of the pad is specific to the make and model of your brake caliper. Always buy pads that are listed as compatible with your exact brake model (e.g., Shimano MT200, Tektro HD-E350).
Understanding Brake Pad Compounds
The material, or "compound," of the brake pad determines its performance characteristics. This is the most important decision you will make.
| Pad Type | Best For | Pros | Cons | E-Bike Suitability |
|---|---|---|---|---|
| Resin (Organic) | Casual city riding, dry conditions, riders who prioritize quiet operation. | Excellent initial bite, very quiet, quick bed-in time. | Wear out quickly, can fade under high heat (long descents). | Good for lightweight commuter e-bikes on flat terrain. Not recommended for heavy cargo e-bikes or hilly areas due to poor heat management. |
| Sintered (Metallic) | Heavy e-bikes, long descents, wet and muddy conditions, aggressive riding. | Extremely durable, excellent performance in all weather, handle heat well. | Can be noisy, longer bed-in process, can wear rotors faster. | Highly Recommended. The superior durability and heat resistance make them the ideal choice for the higher weight and speeds of most e-bikes. |
| Ceramic | Performance-oriented riders seeking a balance of power and low noise. | Quiet like resin, durable and heat-resistant like metallic. | Typically the most expensive option. | An excellent premium, all-around choice for any e-bike. They provide the best of both worlds and are a fantastic upgrade for any system. |
For e-bikes, sintered (metallic) pads are often the default recommendation. Their ability to manage heat and resist wear under heavy loads is a significant safety advantage, a fact supported by many expert reviews on brake pad performance.
Gearing Up: Tools and Supplies
Having everything you need laid out before you begin makes the process smooth and frustration-free. A clean workspace is a safe workspace.

Essential Toolkit
- New e bike brake pads (the correct shape and compound for your brakes)
- Hex (Allen) keys, typically 4mm and 5mm sizes
- Needle-nose pliers (for removing split cotter pins)
- A piston press tool or a clean, wide, flat-head screwdriver
- Isopropyl alcohol (70% or higher)
- Clean, lint-free rags or paper towels
- Nitrile gloves (to prevent skin oils from contaminating brake parts)
- A bike repair stand (highly recommended for ease of work, but not essential)
How to Change Brake Pads: The Guide
This step-by-step process will guide you through the replacement. Take your time, and if you're ever unsure, refer back to the photo you took in Step 2.
Step 1: Secure Bike, Remove Wheel
First, secure your bike. A repair stand is ideal as it brings the bike to a comfortable working height. If you don't have one, you can carefully flip the bike upside down, resting it on the handlebars and seat. It's a good practice to remove your e-bike's battery to make the bike lighter and prevent any accidental motor engagement.
Next, remove the wheel of the brake you are servicing. This gives you clear access to the brake caliper, making the job much easier and safer.
Step 2: Remove Old Brake Pads
Look at the brake caliper. The pads are held in place by either a threaded bolt (which requires a hex key) or a split cotter pin (which looks like a small pin with a looped head).
- For a threaded bolt: Use the appropriate hex key to unscrew and remove it.
- For a cotter pin: Use needle-nose pliers to straighten the bent end of the pin, then pull it out from the looped side.
- Pro Tip: Before you start, take a quick photo of the caliper with your phone. It serves as a perfect reference if you forget how the pin or spring is oriented.
Once the pin or bolt is removed, the old brake pads should be loose. You can now pull them out from the top or bottom of the caliper. Note that they are usually held together by a small metal spring—the new pads will come with a new one.
Step 3: Clean and Reset Pistons
With the old pads out, you'll see the circular caliper pistons that push the pads. They are likely dirty and extended.
First, spray some isopropyl alcohol onto a clean rag and thoroughly wipe the inside of the caliper. Removing brake dust and grime is important for smooth operation. Next, you must push the pistons back into the caliper body to make space for the thick new pads. Use a dedicated piston press tool or the wide, flat end of a clean screwdriver. Place the tool against the pistons and gently and evenly push them back until they are flush with the inside of the caliper.
Warning: Never use a sharp object, and never push on only one side, as this can damage the delicate ceramic pistons.
Step 4: Install New Brake Pads
Take your new e bike brake pads and place the new spring between them, ensuring it's oriented correctly (refer to your photo or the old pads). The spring's job is to push the pads apart when the brake is released.
Squeeze the new pad-and-spring assembly together and slide it into the caliper opening. Align the tab holes on the pads and spring with the hole in the caliper body. Re-insert the retaining bolt or cotter pin. If it's a bolt, tighten it securely. If it's a cotter pin, slide it through and use your needle-nose pliers to bend the end to prevent it from backing out. For a visual reference, you can review a detailed guide from Park Tool.
Step 5: Re-install Wheel and Center
Carefully re-install the wheel, making sure the brake rotor slides cleanly into the narrow gap between the new pads without getting forced. Secure the wheel axle.
Now, spin the wheel. If you hear a rubbing sound, the caliper is likely not centered. To fix this, slightly loosen the two main bolts that mount the caliper to the bike frame. Squeeze the corresponding brake lever firmly and hold it. While holding the lever, re-tighten the two mounting bolts. This action uses the rotor itself to perfectly center the caliper. Release the lever, spin the wheel again, and it should now be silent.
The Final Step: Bedding-In Brakes
This is a critical, non-negotiable step that many people skip. Properly bedding-in your new e bike brake pads ensures maximum stopping power, prevents noise, and prolongs the life of both the pads and the rotor.
What is "Bedding-In"?
Bedding-in is the process of transferring a thin, even layer of friction material from the new pads onto the surface of the brake rotor. This pad-and-rotor mating creates the ideal surface for powerful, consistent, and quiet braking.
The Safe Bedding-In Procedure
You need a safe, flat, traffic-free area like an empty parking lot for this process.
- Get your e-bike up to a moderate speed, around 12-15 mph (20-25 kph).
- Apply one brake (either front or rear) firmly and consistently until you slow down to a walking pace. Do not come to a complete stop or lock up the wheel.
- Release the brake lever and pedal to get back up to speed.
- Repeat this process 10-15 times for the first brake. You should start to feel the braking power increase.
- Now, do the exact same procedure (10-15 gradual slowdowns) for the other brake.
- Finally, perform 3-5 more slowdowns from a slightly higher speed to complete the process.
Your brakes are now bedded-in and ready to provide the safe, reliable stopping power you need for your e-bike adventures.
Frequently Asked Questions
Q: How often should I replace my e bike brake pads?
A: The replacement frequency depends on your riding style, terrain, and brake pad type. Heavy riders or those who ride in hilly areas may need to replace pads every 500-1000 miles, while casual riders might get 2000-3000 miles from a set of quality sintered pads.
Q: Can I replace just one brake pad instead of both?
A: No, you should always replace brake pads in pairs (both pads on the same brake). Replacing only one pad can lead to uneven braking, poor performance, and potential safety issues.
Q: What happens if I don't bed-in my new brake pads properly?
A: Skipping the bedding-in process can result in poor braking performance, squealing noises, uneven pad wear, and reduced pad life. The pads may also take much longer to reach their full stopping power potential.
Q: Are expensive ceramic brake pads worth it for my e-bike?
A: Ceramic pads offer the best balance of performance, durability, and quiet operation, making them excellent for e-bikes. While they cost more upfront, they often last longer and provide better overall value, especially for frequent riders.
Q: How do I know if my brake rotors need replacing along with the pads?
A: Check your rotors for deep grooves, warping, or thickness below the manufacturer's minimum specification (usually stamped on the rotor). If the rotor surface feels rough or has deep scratches that catch your fingernail, it's time to replace both the rotor and pads together.


Leave a comment