


Best Mountain Bike Grips: How to Choose the Right One for Your Ride
What Makes the Best Mountain Bike Grips?
Your mountain bike grips are the most personal contact point on your bike. They often get overlooked even though they have a huge impact on your ride. The number of grip options can feel overwhelming, but picking the right pair is one of the fastest and cheapest ways to make your bike feel better. Good grips do way more than just give you something to hold onto. They are your main connection for control and feedback from the trail. That’s why choosing the best mountain bike grips isn’t just about comfort—it directly impacts your handling and trail performance.
The right grips can make you more comfortable, give you better control, and reduce hand fatigue. Bad grips can cause arm pump, blisters, numbness, and make you feel less confident when the trail gets rough. This guide will help you cut through all the confusion. We won't just list popular products but will give you a clear framework to understand what you need.
By the end, you'll know how to pick the best mountain bike grips for your riding style, hand size, and trail preferences. Whether you're looking for the best MTB grips for control, comfort, or vibration damping, the right choice can completely change how your ride feels. The key is understanding yourself first, then matching that to the right technology.

Step 1: Match Your Riding Style to the Best Mountain Bike Grips
You need to look at your own riding before you look at any products. The best grips for mountain bike riding are different for every rider. Answer a few key questions to build your personal spec sheet that makes choosing simple.
Grip Needs by Mountain Bike Riding Style
Different types of mountain biking put different demands on your grips. This is the first thing to consider when picking grips.
- Cross-Country (XC): Weight and efficiency matter most here. XC riders usually like thinner, firmer grips because they give a direct connection to the handlebar for precise steering. The firm material makes sure no energy gets wasted in squishy rubber.
- Trail / All-Mountain: This is the sweet spot for riders who want versatility. Trail riders need grips that balance all-day comfort for long climbs with good grip and vibration control for descents. This category has the most options to choose from.
- Enduro / Downhill (DH): Control and comfort are must-haves for gravity riding. These riders need maximum vibration control to fight fatigue on long, rough descents. Soft, sticky materials and larger diameters work best, with ultra-secure lock-on clamps to prevent twisting under heavy loads.
- Bikepacking / Long-Distance: When you're riding for hours or days, preventing nerve pressure is the top goal. Shaped grips with large, flared platforms to support your palm work best for spreading out pressure and stopping hand numbness.
Hand Size and Pain Points
Your body tells you what you need on the biking trail. Listen to what it's saying. The basic rule is simple – riders with large or big hands often feel better with thicker grips that offer more padding and surface area to reduce pressure points. This is very personal though. Common grip diameters range from slim 29-30mm up to extra-large 34mm or more. Some riders with large hands still prefer thin grips for a better wrap-around feel.
📏 Mountain Bike Grip Diameter Guide by Hand Size
| Hand Size | Recommended Diameter | Example Grip Feature | Best for... |
|---|---|---|---|
| ✋ Small | 29–31mm | Thin, wrap-friendly, firm rubber | Control + comfort |
| ✋✋ Medium | 31–32mm | Balanced cushioning with grip texture | Most general riders |
| ✋✋✋ Large / Big | 32–34mm+ | Thick, padded, anti-fatigue shape | Best mountain bike grips for big hands |
Pain Points: Are you having specific problems?
- Arm Pump / Fatigue: If your forearms burn on descents, you're fighting vibration. Look for grips with softer rubber or a thicker profile to provide more cushioning and absorb trail chatter.
- Numbness (Ulnar Nerve): That tingling or numbness in your pinky and ring finger often means pressure on the ulnar nerve. Riders with carpal tunnel syndrome often experience similar symptoms, and ergonomic grips with shaped palm platforms are widely considered the best mountain bike grips for carpal tunnel relief. SThese shaped designs are often considered the best mountain bike grips for numb hands or carpal tunnel issues, as they help relieve nerve pressure and distribute palm contact more evenly.
- Blisters: Blisters come from friction. This can be caused by a grip pattern that doesn't work with your hands, a grip that's too hard, or your hands moving too much. A stickier material or different surface texture might solve this.
Best Mountain Bike Grips by Hand Size
- Small Hands (29–31mm): Look for thinner grips that allow a full wrap for control without over-gripping. Slim profiles with soft textures work well here.
- Large / Big Hands (32–34mm+): Thicker grips with added cushioning reduce hand strain and provide more surface contact, making them the best mountain bike grips for big hands or riders who prefer a fuller grip feel. These are often the best mountain bike grips for big hands.
- Medium Hands (31–32mm): A wide range of grips will work—choose based on your preference for control vs. comfort.
Gloves or No Gloves?
This simple choice has a big impact on the ideal grip. If you always wear gloves, you have padding and grip built-in already. You might prefer a thinner grip or one with a more pronounced pattern to get better trail feedback since the glove already provides some cushioning.
Riding bare-handed requires the grip to do all the work. On a long, hot ride, sweaty palms can make a hard grip feel slippery and unsafe. Gloveless riders almost always like softer, stickier materials that feel tacky to the touch, giving confidence and control even when things get sweaty. These are especially helpful for sweaty hands, where the best mountain bike grips for sweaty hands use moisture-wicking textures and ultra-tacky compounds to maintain control.
Key Features That Define the Best Mountain Bike Grips
Now it's time to decode the technical features of grips themselves. Understanding this will help you look at a product description and know exactly how it will perform on the trail.
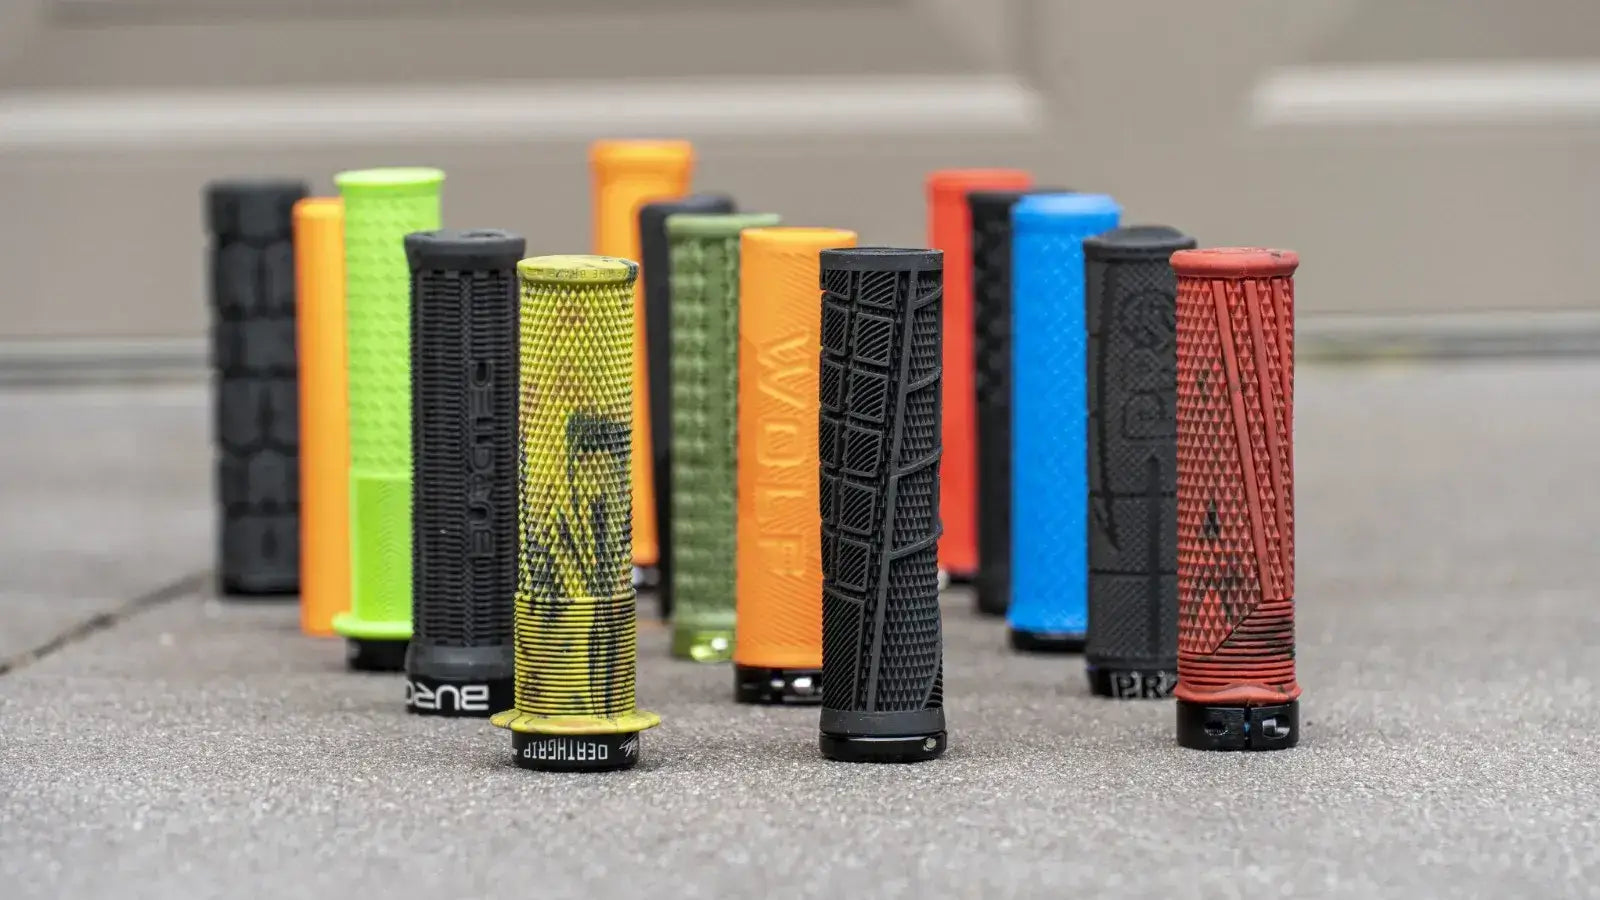
Material and Compound
The material defines how the grip feels - how it absorbs vibration, how sticky it is, and how long it lasts.
| Material | Pros | Cons | Best For |
|---|---|---|---|
| Soft Rubber Compound | Excellent grip (tacky), superior vibration damping. | Wears out faster, can feel "squirmy" to some riders. | Enduro/DH, gloveless riders, riders with arm pump. |
| Firm Rubber Compound | Highly durable, provides direct trail feedback. | Less vibration damping, can feel harsh on rough trails. | XC racing, riders who prioritize durability and control. |
| Silicone / Foam | Extremely lightweight, excellent at damping high-frequency chatter. | Less durable, can be prone to tearing, may twist if not installed perfectly. | Weight-conscious XC riders, riders seeking maximum vibration absorption. |
The choice between these materials is a classic trade-off between grip, comfort, and durability. There is no single "best" material - only what's best for you. Still, some of the best MTB grips across categories combine soft rubber with secure lock-on designs for optimal control and vibration damping.
Diameter and Shape
This is more than just hand size. A thinner grip lets your fingers wrap around more fully, which can actually reduce fatigue for some riders by allowing a more relaxed grasp. A thicker grip provides more material for cushioning, which directly helps absorb impacts.
Shape matters too:
- Standard (Round): This is the most common shape. It gives a consistent feel no matter how you rotate your hand, making it great for dynamic, aggressive riding.
- Shaped (Ergonomic): These grips have wings, flares, or molded palm rests. They support your hand's natural shape and spread pressure away from sensitive nerves. While they're great for long-distance comfort, some aggressive riders find they limit small adjustments of hand position on technical terrain.
Clamp Type
How the grip attaches to the bar affects security and feel. Lock-On Grips are the industry standard for good reason. They have a plastic sleeve with rubber grip molded over it, and one or two aluminum collars that clamp onto the handlebar with a small bolt.
- Pros: Extremely secure and won't twist, even when wet. They're incredibly easy to install and remove without any mess or hassle.
- Cons: The outer clamp on single-clamp designs can create a hard plastic pressure point for riders who put their hands on the very end of the bar.
Slide-On (Push-On) Grips are the original style - simple sleeves of rubber that slide directly onto the bar.
- Pros: Very lightweight and provide cushioning across their entire length, with no hard outer clamp.
- Cons: Can be difficult to install and can twist or slip in wet conditions if not properly secured (often with wire or glue).
Tread and Flanges
The surface pattern isn't just for looks. Different textures serve different purposes. Waffle patterns under the fingers provide extra grip for pulling on the bars while ribbed patterns can offer a softer feel and help manage moisture. Fine diamond or knurled patterns offer a great all-around tacky feel.
An inner flange is a raised ring on the inboard side of the grip. It was originally designed to keep hands from slipping inward, but most modern mountain bike grips are flangeless to allow easy access to shifter and dropper post levers.
Step-by-Step Guide to Choosing the Best Mountain Bike Grips
Finding the best mountain bike grips for your needs can now be a logical, stress-free process when you break it into simple steps. Follow these three steps to match your needs with available features and make a confident choice.
Step 1: Define Your Profile
Take your answers from the first section and summarize them. Creating a simple checklist makes your primary requirements clear.
Fill in the blanks:
- My primary discipline is: __.
- My main complaint on the trail is: __.
- I typically ride with / without gloves. (Circle one)
- My hand size is roughly small / medium / large. (Circle one)
This profile is your guide. Every feature you consider should be measured against it.
Step 2: Prioritize Features
Use your profile to decide which features matter most. You can't always have everything, so you must prioritize.
Example 1: The Enduro rider with arm pump needs maximum vibration control. Your search should focus on soft material and larger diameter. Durability and weight are less important.
Example 2: The competitive XC racer wants speed and efficiency. Your search should focus on light weight and firm material for direct control. Long-term comfort and extreme stickiness are less critical.
Example 3: The bikepacker with numb hands has a specific medical issue. Your top priority is a shaped design that provides palm support above all else. Material and weight matter far less than solving the numbness problem.
🧩 Best Mountain Bike Grips: Which Is Right for You?
| Rider Type | Priority Feature | Recommended Grip Style | Notes |
|---|---|---|---|
| 🏁 XC Racer | Direct control, low weight | Thin, firm rubber grips | Best MTB grips for speed and precise steering |
| 🚵 Trail Rider | Comfort + vibration control | Medium thickness, textured surface | Versatile option for varied terrain |
| 🧗 Enduro/DH | Max cushioning, no twist | Soft, thick grips with double lock-on | Best mountain bike grips for fatigue and control on rough descents |
| 🎒 Bikepacker | Palm support, ergonomic shape | Ergonomic grips with wide platforms | Best mountain bike grips for numb hands or carpal tunnel |
| 🖐️ Gloveless Rider | Grip + tackiness | Soft compound with anti-slip pattern | Best mountain bike grips for sweaty hands and bare palms |
Step 3: Read Reviews
Now you're ready to look at products. When you read reviews, keep your specific profile in mind. A five-star rating means nothing if the reviewer has completely different needs than you.
Don't just look at the score. Look for reviewers who share your discipline, hand size, or complaints. A review from a DH rider praising a grip's vibration control is valuable if you're an Enduro rider with arm pump. A review from an XC racer complaining a grip is "too soft and vague" is actually positive if you're a trail rider looking for more comfort.
🎯 Quick Recap: What Makes the Best Mountain Bike Grips?
✅ Match your riding style (XC, trail, DH)
✅ Consider your hand size and glove use
✅ Look for material and tread suited to your terrain
✅ Prioritize features that solve fatigue or numbness
✅ Don’t ignore installation and maintenance—fit matters!
Installation and Maintenance Tips for Bike Grips
Proper installation and care will ensure you get peak performance from your new grips. Many riders skip these simple steps, but they're key to a safe and enjoyable experience.
Installing Lock-On Grips
This is straightforward and only requires a hex wrench. Remove your old grips by loosening the clamp bolts if they're lock-ons, or carefully cutting them off if they're slide-ons. Clean the electirc bike handlebar surface thoroughly with rubbing alcohol to remove dirt or oils.
Slide the new grip on, leaving the clamp bolt loose for now. Install your brake and shifter levers, then sit on the bike to set the angle of your controls for best comfort. Once controls are set, position the grip and tighten the clamp bolts. Use a torque wrench if you have one and tighten to the manufacturer's spec (usually 2-4 Nm). Don't over-tighten, as this can damage the grip or handlebar.
Installing Slide-On Grips
These need more technique. The goal is to use temporary lubrication that allows the grip to slide on and then disappears, leaving the grip stuck in place. The most common methods are spraying the inside of the grip and bar with rubbing alcohol or hairspray. Some mechanics use compressed air with a special nozzle to "float" the grip on.
Grip Care and Replacement
Your grips will perform better and last longer with basic care. Over time, dirt and oils from your hands can make a sticky grip feel slick. To restore its original feel, wash it with warm water, dish soap, and a soft brush. Rinse thoroughly and let it air dry. Know when it's time for new grips. Look for worn-down or shiny tread patterns, torn or chunked rubber, or any twisting or slipping on the bar. A damaged end cap on a lock-on grip should also be replaced, as an exposed handlebar end is a serious safety hazard.
Why Upgrading to the Best Mountain Bike Grips Is Worth It
Choosing the best mountain bike grips starts with knowing how you ride—and how your hands feel on the trail. Whether you're battling numb hands, sweaty palms, or just need better control on long descents, the right grips can transform your ride.
With years of real-world riding insight behind this guide, we've broken down everything from riding style and grip diameter to material choice and ergonomic features. It’s not about hype—it’s about finding what works for you.
Ready to upgrade? Explore your options, test different sizes, and choose the best mountain bike grips that truly match your hand size, trail demands, and comfort priorities. It’s one of the simplest and smartest changes you can make—whether you're a weekend trail rider or a daily MTB commuter.
Frequently Asked Questions
1. Q: How often should I replace my mountain bike grips?
A: Replace your grips when you notice worn tread patterns, torn rubber, or if they start slipping on the handlebar. Most riders replace grips every 1-2 years depending on how much they ride and the grip material.
2. Q: Can I use the same grips for different types of mountain biking?
A: While some grips work across disciplines, you'll get better performance matching grips to your primary riding style. XC riders need different features than downhill riders, so consider your main type of riding when choosing.
3. Q: Do I need different grips if I switch between riding with and without gloves?
A: Yes, glove use significantly affects grip choice. Gloveless riders typically need softer, tackier compounds for better grip, while gloved riders can use firmer compounds since the glove provides cushioning.
4. Q: What's the difference between single-clamp and double-clamp lock-on grips?
A: Single-clamp grips have one clamp on the inboard side, while double-clamp grips have clamps on both ends. Double-clamp grips are more secure but add weight, while single-clamp grips can have a hard plastic end that some riders find uncomfortable.
5. Q: How do I know what diameter grip is right for my hand size?
A: Generally, larger hands work better with thicker grips (32-34mm), while smaller hands prefer thinner grips (29-31mm). However, this is personal preference - some riders with large hands still prefer thin grips for better finger wrap and control.
6. Q: Are there mountain bike grips designed for carpal tunnel syndrome?
A: Yes. Ergonomic grips with palm support are often recommended for riders with carpal tunnel. These reduce pressure on the ulnar nerve and help prevent numbness or tingling in the hands. Look for shaped designs with wide platforms and soft materials.
7. Q: What are the best mountain bike grips for numb hands or wrist pain?
A: Look for ergonomic grips with wide palm platforms and soft materials. These are often the best mountain bike grips for numb hands or riders with carpal tunnel, as they help relieve nerve pressure and reduce tingling during long rides.


Leave a comment