


How to Use Bike Gears: Master Shifting Like a Pro
If you've ever felt scared by all the levers and buttons on your handlebars, you're not alone. For many new cyclists, bike gears seem like a big mystery that's impossible to solve. But learning how to use them is the biggest step you can take to make riding easier, more comfortable, and way more fun. The main idea is really simple. We're here to help clear up the confusion, so you'll feel confident on your very next ride.
The Quick Answer
- Your Left Hand (Front Gears): This makes big, powerful jumps in difficulty. Use it for major terrain changes, like starting up a steep hill or reaching the top.
- Your Right Hand (Rear Gears): This makes small, fine adjustments to keep things smooth. Use it all the time to keep your pedaling speed feeling steady and comfortable.
- The Golden Rule: Always pedal gently when you shift gears. The chain must be moving to change gears properly.
Learning to use your gears the right way will help you climb hills you thought were impossible, ride faster on flat roads with less effort, and reduce strain on your knees and your bike's parts. This guide will walk you through what gears are, why they matter, how to use them, and when to shift, so you can ride like someone who's been doing it for years.
The 'What': Your Gearing System
You don't need to be a bike mechanic to understand this stuff. A basic understanding of the parts makes everything much clearer than it seems at first. The goal of the whole system is to move the chain onto different sized gears to make pedaling easier or harder. Here are the key parts on your bike:
- Shifters: These are the levers or grips on your handlebars that you actually touch. Your right hand controls the rear gears, and your left hand controls the front gears.
- Chainrings: These are the large gears at the front, attached to your pedal cranks where your feet go. Most bikes have two or three of these. The smallest ring is for the easiest pedaling when you're climbing hills, and the largest is for the hardest pedaling when you want speed.
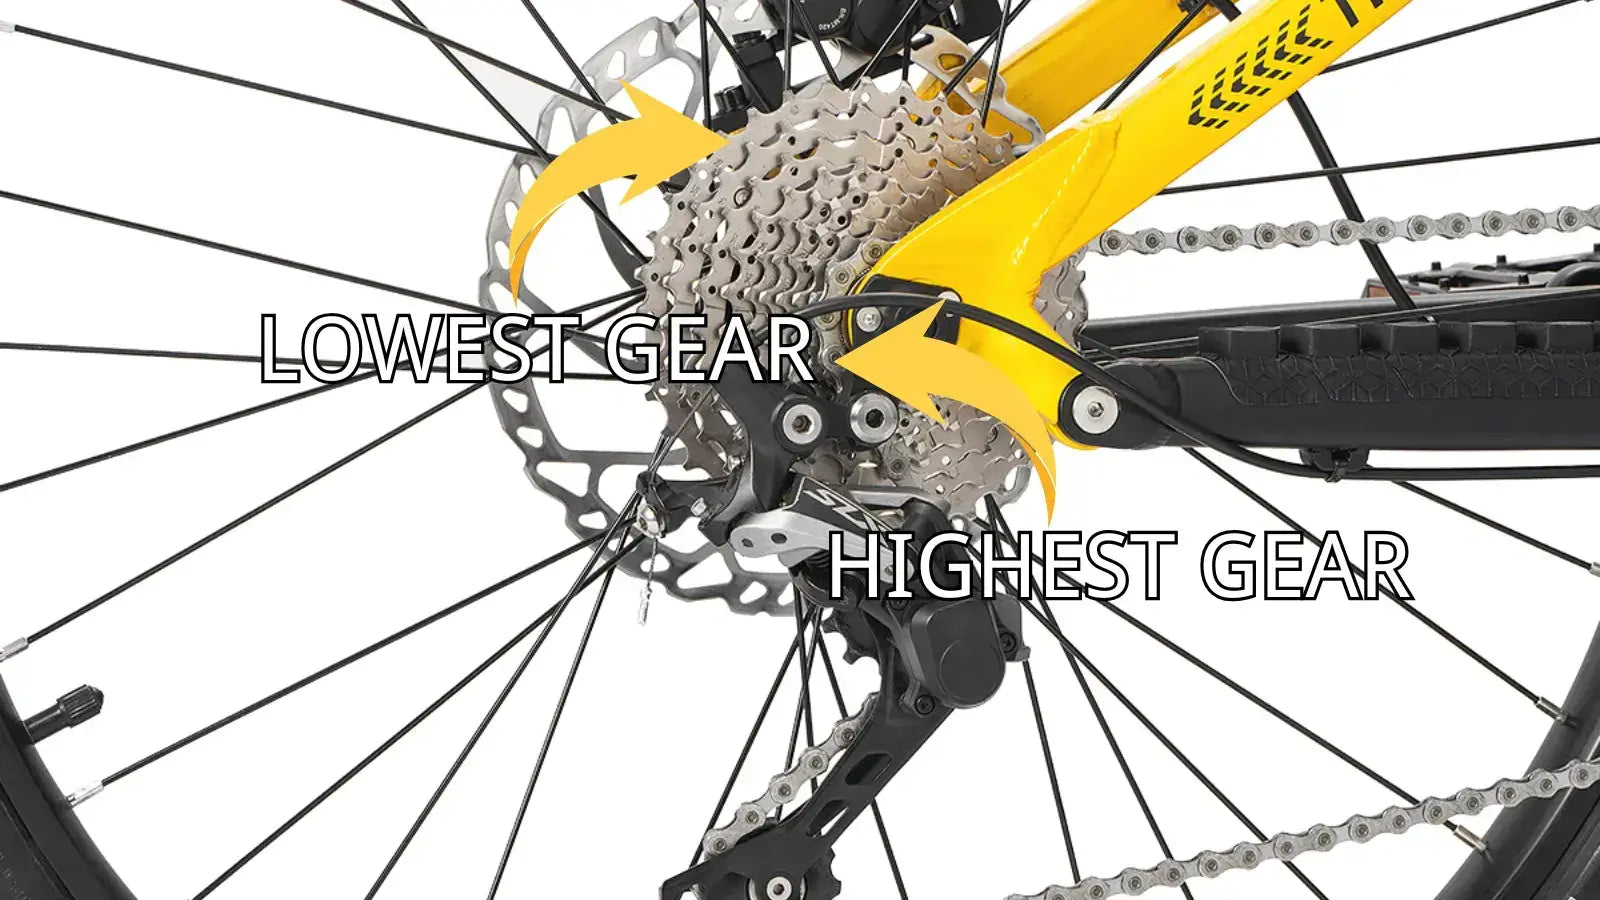
- Cassette: This is the stack of many gears on your rear wheel that looks like a cone. There can be anywhere from 7 to 12 separate cogs stacked together. The largest cog makes pedaling easiest, and the smallest cog makes it hardest.
- Derailleurs: These are the clever mechanisms that physically push the chain from one gear to another when you shift. You have a front derailleur for the chainrings and a rear derailleur for the cassette.
- Chain: This connects the front chainrings to the rear cassette, moving power from your legs to the rear wheel. In short: You use the shifters to tell the derailleurs to move the chain onto a different gear on the chainrings or the cassette.
The 'Why': Chasing Perfect Cadence
Many beginners think the goal is to be in a specific "hill gear" or "flat gear" all the time. The real secret to great shifting is to stop thinking about the gears and start thinking about your legs instead. The goal is to keep a perfect pedaling rhythm, which experts call cadence. Cadence is the speed at which you spin the pedals, measured in revolutions per minute. Think of it like the "Goldilocks" principle where everything needs to be just right:
Too Slow (Mashing): Pedaling feels like a heavy, grinding effort that hurts. It feels like you're pushing a huge weight with every stroke, which is incredibly hard on your body. This puts massive strain on your knees and can damage your bike's parts over time.
Too Fast (Spinning Out): Your feet are flying around so fast you can't apply any real pressure to move forward. You're wasting energy just trying to keep up with the pedals without actually going anywhere.
Just Right: Pedaling feels smooth, easy, and rhythmic like a song. You can keep this pace comfortably for a long time without burning out your muscles or bouncing around in the saddle.
While you don't need a fancy computer to measure it exactly, the ideal target for most cyclists is a cadence between 70-90 RPM. This range gives you the best mix of power and efficiency for most riding situations. Your gears are simply the tool you use to keep your legs spinning at this comfortable rate, no matter what the terrain does. As one study notes, the key is finding a sustainable cadence that works for your body.
When the road tilts up, you shift to an easier gear to keep your cadence up. When you speed up, you shift to a harder gear to keep from spinning out uselessly.
The 'How': Your Shifting Guide
Now for the practical part that you'll actually use on the road. Operating the shifters is simple once you learn a few key rules that work every time.
The Golden Rules of Shifting
Follow these three rules every single time you shift, and you'll avoid almost all common gear-changing problems like loud clunking, grinding sounds, and chains that fall off.
- Rule 1: Always be pedaling. The chain has to be moving forward for the derailleur to guide it onto the next cog smoothly. If you stop pedaling completely, you can't shift at all.
- Rule 2: Ease up the pressure. This is the most important rule that most people miss completely. Just before you press the shift lever, slightly reduce how hard you're pushing on the pedals for just a second. Don't stop pedaling, just soften the force for the moment it takes the chain to move. Then put your power back on like normal. This lets the chain shift smoothly instead of being forced under heavy tension.
- Rule 3: Shift one gear at a time.
Especially on the rear cassette, give the chain a moment to fully settle with the new cog before making another shift. Rapid-fire shifting can cause the chain to skip gears or get jammed up.
Left Hand vs. Right Hand
This is the central concept that will make everything click. Burn this into your brain, and you'll always know which lever to use without thinking.
| Left Hand Shifter | Right Hand Shifter |
|---|---|
| Controls the Front Gears (Chainrings) | Controls the Rear Gears (Cassette) |
| Makes big jumps in difficulty | Makes small, fine-tuning adjustments |
| Use for major terrain changes (big hills) | Use constantly to maintain cadence |
| Smaller chainring = Easier | Larger cog = Easier |
| Larger chainring = Harder | Smaller cog = Harder |
Understanding Shifter Types
While the basic principle is the same, the actual controls can look different depending on what kind of bike you have. Here are the most common types you'll see.
- Trigger Shifters: Found on most mountain and hybrid bikes that people use for casual riding. You'll typically have two levers per side, operated by your thumb and index finger easily. One lever shifts to an easier gear, and the other shifts to a harder one.
- Integrated Brake/Shift Levers: Standard on modern road bikes with the curved handlebars. The brake lever itself also moves sideways to shift gears when you push it. There is often a second, smaller paddle behind the main brake lever for shifting too.
Different brands work slightly differently, but a common setup involves pushing the whole brake lever inward to shift to an easier gear and pushing the smaller paddle to shift to a harder gear. You can learn more about how different gear systems work from various manufacturers like Shimano, SRAM, and Campagnolo.
- Grip Shifters: Found on some budget-friendly bikes and kids' bikes that keep things simple. You change gears by twisting a section of the handlebar grip, similar to how a motorcycle throttle works.
The 'When': Real-World Scenarios
Theory is great for understanding, but actual riding happens on real roads with real hills and stops. The true mark of a skilled cyclist is seeing the need to shift before it becomes critical and you're already struggling. As experts will tell you, anticipation is the most important skill in smooth shifting. Look ahead and get ready for what's coming instead of reacting after it's too late.
Scenario 1: Approaching a Hill
You see the road start to tilt upward ahead of you. Don't wait until you're already struggling and your legs are burning to make changes.
Before the hill: As you feel the very first hint of resistance, use your right hand to shift into one or two easier gears on the rear cassette. The goal is to keep your pedaling speed exactly the same as it was on the flat road.
As it gets steeper: Continue making small, one-gear adjustments with your right hand as you need them. If you find yourself in the easiest gear on the back (the biggest cog) and it's still too hard, it's time for the big change.
Use your left hand to shift the front derailleur to your smaller chainring. This is a huge jump in ease, so be ready for the change. You may need to immediately shift to a harder gear in the back with your right hand to smooth out the transition and keep your cadence from suddenly becoming too fast.
Scenario 2: Riding Uphill
You're on the climb and focused on making it to the top. Your focus now is on survival and not wasting energy with poor technique. Your right hand is your best friend here for making small adjustments. Keep your head up and focus on keeping that smooth, steady 70-90 RPM cadence going no matter what. If your legs start to burn and slow down, click into an easier gear with your right hand. Don't be afraid to use all the gears on your cassette because that's exactly what they're there for.
Scenario 3: Cresting the Hill
You've made it to the top and conquered the climb! Now it's time to get your speed back and enjoy the reward for your hard work.
As you crest: The resistance disappears almost instantly as you reach the top. To avoid spinning out uselessly, immediately start shifting to harder gears with your right hand. Click down one or two cogs at a time as you pick up speed naturally.
Going downhill: If you shifted to the small front chainring for the climb, now is the perfect time to shift back to the big one with your left hand.
Do this once you have some momentum and aren't struggling anymore. As you continue to speed up down the hill, keep using your right hand to shift to smaller cogs on the cassette to match your increasing speed.
Scenario 4: Coming to a Stop
You see a stop sign or red light ahead and need to slow down. This is a critical moment for thinking ahead instead of just reacting. If you stop in a hard gear, starting again will be miserable and embarrassing.
As you coast to a stop: While you are still pedaling gently and slowing down, use your shifters to select an easier gear—one you'll be comfortable starting in when it's time to go.
A gear somewhere in the middle of your rear cassette is usually a good choice for most situations. This way, you're completely prepared to speed up smoothly when the light turns green or traffic clears.
Scenario 5: Starting from a Stop
Because you thought ahead in the last step, this part is easy and smooth. You're already in a moderately easy gear that won't make you struggle.
As you push off: Start pedaling normally without straining or grinding. As your speed increases and your cadence gets too fast for the gear you're in, start shifting into progressively harder gears with your right hand.
Click, pedal, gain speed, click again in a smooth rhythm. This is exactly how you speed up efficiently without wasting energy or looking like a beginner.

Common Shifting Mistakes
Avoiding these common problems will keep your bike running smoothly and save you from frustrating mechanical issues that can ruin a good ride.
Mistake 1: Cross-Chaining
This happens when the chain is running at an extreme angle that puts stress on everything. For example, from the biggest chainring in the front to the biggest cog in the back, or from the smallest chainring to the smallest cog. This stretches the chain unnaturally, causes noisy grinding sounds, and makes your bike parts wear out much faster than normal. Avoid these big-big and small-small combinations whenever possible.
Mistake 2: Shifting Under Load
This is the worst mistake you can make when learning how to change gears on a bike. It means trying to change gears while standing up and stomping on the pedals with all your might like you're trying to break something. This forces the chain violently and can lead to a loud, scary BANG, a skipped gear, or even a completely broken chain that leaves you stranded. Always ease up the pedal pressure for the moment of the shift, then put your power back on.
Mistake 3: Shifting While Stationary
Remember the golden rule: the chain must be moving for shifts to work. If you try to shift while at a complete stop, the derailleur will move, but the chain won't go anywhere. When you start to pedal again, the chain will likely get jammed or fall off completely, which is frustrating and embarrassing. If you forget to shift down before stopping, lift the rear wheel slightly off the ground and turn the pedals by hand as you shift to your desired starting gear.
Mistake 4: Ignoring Maintenance
Your gears are a mechanical system that needs occasional care to work properly. A dirty, dry chain that hasn't been cleaned won't shift well no matter how good your technique is. Over time, shifter cables can stretch and get loose, causing sloppy or completely inaccurate shifting that makes riding frustrating. Keep your chain clean and oiled regularly, and if your shifting becomes unreliable, a simple tune-up at a local bike shop can make it feel brand new again.
Your Ride Starts Now
Gears are not a complex puzzle that only experts can solve. They are simply a tool to help you find a perfect, sustainable rhythm that feels good for your body. Stop thinking about which gear number you're in and start focusing on how your pedaling actually feels. Is it too hard and making your legs burn? Shift to an easier gear with your right hand. Is it too easy and making you spin uselessly?
Shift to a harder one. The key is to use your right hand constantly for small adjustments and your left hand only occasionally for big changes when the terrain really changes. Master the art of looking ahead and anticipating what's coming, always ease up on the pedals when you shift, and keep your chain moving. The only way to truly learn how to use bike gears is by actually doing it on real rides. On your next ride, make a conscious effort to play with your gears and experiment. Go out with the sole purpose of shifting often and paying attention to how it feels.
Feel the difference between easy and hard gears in different situations. Soon, it will become completely automatic, and you'll wonder how you ever rode without using all your gears properly.
FAQ
1. Q: How do I know if I'm in the right gear?
A: You're in the right gear when pedaling feels smooth and you can maintain a steady rhythm without straining your legs or spinning too fast. If you're grinding hard or your feet are flying around uselessly, it's time to shift.
2. Q: Can I damage my bike by shifting incorrectly?
A: Yes, shifting under heavy load (while pedaling very hard) or cross-chaining (using extreme gear combinations) can damage your chain, derailleur, or other components. Always ease up on pedal pressure when shifting and avoid big-big or small-small gear combinations.
3. Q: Should I shift gears when going uphill or before the hill?
A: Always shift before you need it. Start shifting to easier gears as soon as you feel the first hint of resistance from a hill. Don't wait until you're already struggling, as this makes shifting harder and less smooth.
4. Q: What's the difference between front and rear gears?
A: Front gears (controlled by your left hand) make big changes in difficulty and are used for major terrain changes. Rear gears (controlled by your right hand) make small adjustments and should be used constantly to fine-tune your pedaling effort.
5. Q: How often should I shift gears while riding?
A: You should shift frequently with your right hand to maintain a comfortable pedaling rhythm. Good cyclists make small gear adjustments constantly as speed and terrain change, rather than staying in one gear for long periods.


Leave a comment