


How to Put a Bike Tire on a Rim Step by Step
Introduction: You Can Do This!
Facing a flat tire or a new tire upgrade can feel like a major roadblock. But learning how to put a bike tire on a rim is a basic skill that every cyclist can and should master. It's less about brute force and more about technique. The main process is simple: you seat one edge of the tire, insert the inner tube, and then work the second edge onto the rim.
This guide will walk you through every step in detail. We'll cover everything from gathering the right tools and understanding your equipment to the exact, hands-on process. More importantly, we'll share the professional techniques for dealing with those stubbornly tight tires and how to avoid the common mistakes that frustrate so many beginners. Mastering this skill will save you time, money, and the stress of being stranded with a flat.
Before You Begin: 3-Step Prep
Proper preparation is the difference between a frustrating hour of wrestling with rubber and a smooth, successful five-minute job. Taking a moment to get organized and understand your parts will prevent mistakes and make the entire process easier.
Gather Your Essential Tools
Having the right tools on hand makes the job much easier. You don't need a professional workshop, just a few key items. We recommend using a simple checklist to ensure you have everything before you start.
| Tool | Why You Need It |
|---|---|
| Tire Levers (Plastic) | Essential for prying the tire off and, as a last resort, on. We strongly recommend plastic levers as they are far less likely to damage your metal rim or pinch the new inner tube. |
| Floor Pump with Gauge | While a small hand pump works on the road, a floor pump makes inflation fast and easy at home. The gauge is critical for reaching the correct and safe tire pressure. |
| New Inner Tube | If you're fixing a flat, you'll need a new tube. Always check that it matches your tire's size and has the correct valve type (Presta or Schrader). |
| Rim Strip or Tape | This thin strip protects your inner tube from the sharp edges of the spoke holes inside the rim. If yours is old, brittle, or damaged, it needs to be replaced. |
| Rag | Useful for wiping down the rim and cleaning your hands. |
"Read" Your Tire and Rim
Before you start, take a moment to understand the parts you're working with. This basic knowledge is often skipped in simple guides but is key to preventing compatibility issues.
Tire Markings: Look at the sidewall of your tire. You'll see a set of numbers like "700x25c" or "29x2.2". The first number (700, 29) is the diameter of the wheel in millimeters or inches, and the second number (25, 2.2) is the width. This size must match your rim and inner tube. You will also see a recommended pressure range, often listed in both PSI (pounds per square inch) and BAR. Finally, some tires have a small arrow indicating the recommended rotational direction, which is important for optimizing the tread pattern for grip and water shedding.
Rim and Valve Types: There are two common valve types. Schrader valves are wider, like those on a car tire. Presta valves are thinner with a small locknut at the tip that you must unscrew to inflate. Your rim will be drilled for one type, so your inner tube's valve must match.
Sizing Standards: Tire and rim sizing can be complex, with multiple standards used over the years. For those who want to go deeper, the late Sheldon Brown's website remains the industry benchmark and offers a comprehensive guide to tire sizing.
Prepare Your Workspace
Choose a clean, well-lit area to work. This helps you keep track of small parts and spot any issues with the tire or rim. As a bit of first-hand advice, we recommend laying down an old blanket, towel, or a piece of cardboard. This protects your floor from grease and grime, and more importantly, it protects your wheel's hubs and cassette from getting scratched on a hard surface.
The Core Process: Step by Step
With your preparation complete, it's time for the main event. Follow these steps methodically, and you'll have the tire mounted in no time. The key is to work smart, not hard.
-
Inspect and Prepare the Rim: First, use your rag to wipe the inside and outside of the rim clean. This removes any dirt or debris that could damage the inner tube. Now, pay close attention to the rim strip or tape. It should be centered, completely cover all the spoke holes, and be free of any tears, cracks, or damage. The rim tape is the only thing protecting your inflated inner tube from the sharp edges of the spoke holes, so if it looks compromised in any way, you must replace it before proceeding.
-
Install the First Bead: Take your new tire. The "bead" refers to the two inner edges of the tire that hook into the rim. Holding the wheel in your lap, push one bead of the tire into the deep center channel of the rim. Starting at one point, use your hands to work the bead into the rim, moving around the entire circumference of the wheel. This first side should go on easily without the need for any tools.
-
Partially Inflate and Insert the Tube: Take your new inner tube and use your pump to give it just a little bit of air. You want just enough pressure to give the tube a round shape, but it should still be very floppy. This is a crucial trick that professionals use; the slight inflation helps prevent the tube from getting twisted or pinched under the tire bead during the final installation steps, which is a primary cause of frustrating instant-flats. Find the valve hole on your rim, and insert the tube's valve first. Then, gently tuck the rest of the shaped inner tube into the space inside the tire, all the way around the wheel.
-
Seat the Second Bead (The "Thumb" Phase): This is where technique becomes critical. Start on the side of the wheel directly opposite the valve. Using both of your thumbs, begin pushing the second tire bead up and over the edge of the rim. Work your way around the wheel, pushing with both thumbs simultaneously, moving your hands apart and towards the valve. The absolute key to making this easy is to ensure that the tire beads on both sides are pushed into the deepest center channel of the rim as you work. This channel has a smaller diameter, which creates the maximum amount of slack in the tire. This is a key technique for fixing a flat that makes the final, tight section manageable.
Troubleshooting Stubborn Tires
It's common to get the tire mostly on, only to be stopped by a final, very tight section of 6-8 inches that seems impossible to push over the rim. Don't worry, this is normal, especially with new or tubeless-ready tires. The most important thing is to resist the urge to immediately grab a tire lever and use brute force.
Technique 1: The Palm Roll
Before reaching for a tool, try this hands-only technique. Go back around the part of the tire that is already seated on the rim. Squeeze the tire walls together and push them firmly towards the center of the rim. Do this all the way around. This action ensures the bead is sitting in the lowest part of the rim channel, which generates that critical bit of slack you need. Now, return to the final unseated section. Instead of using your thumbs, use the strong, fleshy part of your palm near your thumb to roll that last section of the bead up and over the rim edge. It might take a few firm, rolling pushes, but this often provides the leverage needed to pop it into place.
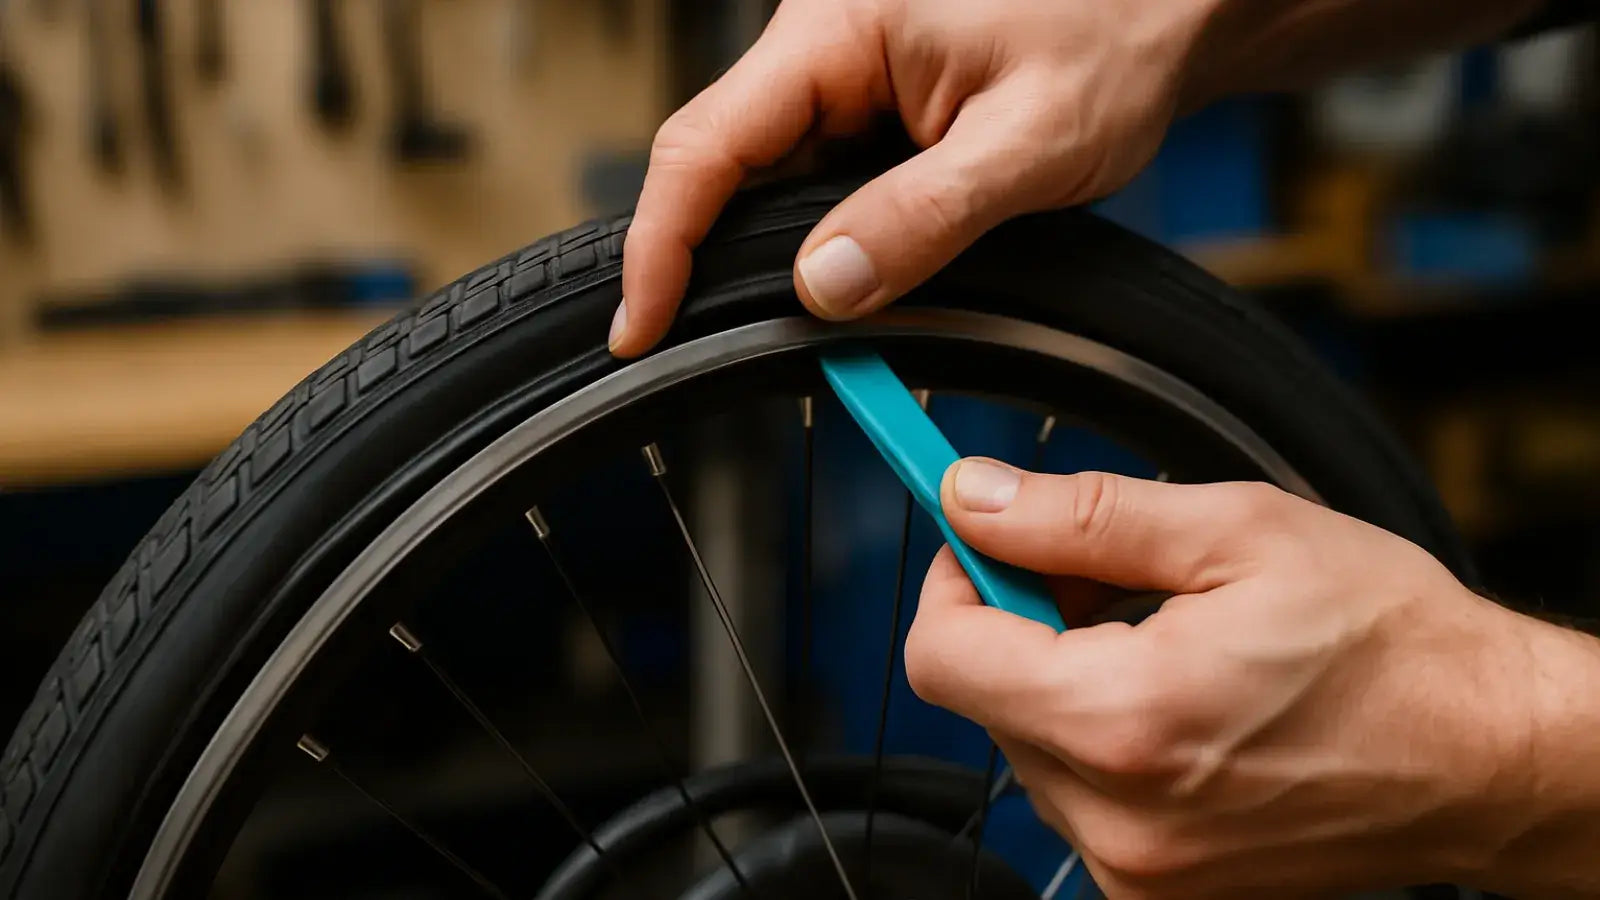
Technique 2: Using a Lever Carefully
If the palm roll doesn't work, it's time to use a tire lever—but with extreme care. This is where most pinch flats occur. Hook one plastic lever under the stubborn section of the tire bead. Be very careful to only hook the bead and not the inner tube that is sitting just underneath it. Gently lift the handle of the lever up and over the rim wall. Instead of sliding it, it's often safer to hold that lever in place and use a second lever an inch or two away to do the same thing. This incremental approach reduces the risk of pinching the tube between the lever and the rim.
Pro Tip: The Zip Tie Trick
For notoriously tight tire and rim combinations, the zip tie trick is an invaluable method. After you have the first bead on the rim and the inner tube inserted, take three or four plastic zip ties. Cinch them down around the tire and rim at evenly spaced intervals. This physically holds the tire beads in the center channel, preventing them from slipping back up onto the outer shelves of the rim. This maintains maximum slack and makes it significantly easier to roll or lever the final section on by hand. Once the tire is fully on, simply cut and remove the zip ties.
Finishing Up: Final Checks
Getting the tire on the rim is the main battle, but these final steps are critical for ensuring your work is safe and ready to ride. Don't skip these checks.
Check the Bead Seat
Before you inflate the tire to full pressure, add just 20-30 PSI. Now, slowly rotate the wheel and inspect both sides. Look for the thin, molded "bead line" on the tire, located just above the edge of the rim. This line should be an even distance from the rim all the way around. If you see a spot where this line dips down and disappears into the rim, the bead is not seated correctly. If you were to inflate it fully, you would risk a dangerous blowout. To fix it, simply deflate the tire, push and pull the tire in that area to loosen it, and reinflate to 20-30 PSI to check again.
Inflate to Desired Pressure
Once you've confirmed the bead is seated evenly, use your floor pump to inflate the tire to your desired pressure. The correct range is printed on the tire's sidewall. Where you set your pressure within that range is a personal preference based on your weight, riding style, and the terrain. As a general rule, lower pressures can offer more comfort and grip on rough surfaces, while higher pressures reduce rolling resistance for a faster feel on smooth pavement. Don't assume that pumping to the maximum pressure is always best.
Reinstall Wheel and Brakes
Carefully guide the wheel back into the dropouts on your bike frame and secure it by tightening the axle nuts or closing the quick-release lever. The final, crucial safety step is to check your brakes. If you have rim brakes, you will have had to disconnect them to get the wheel out. Reconnect the brake cable now. Squeeze the brake lever hard several times to ensure it feels firm and responsive. Finally, look at the brake pads to confirm they are aligned correctly and make contact with the metal rim surface, not the rubber of your new tire.

Conclusion: Ride with Confidence
Congratulations! You now know how to put a bike tire on a rim, from the crucial preparation and tool selection all the way to the final safety checks. You've learned the techniques to handle even the most stubborn tires and to avoid the common pitfalls that frustrate many riders.
Remember the most important tips for success:
- Preparation is key. A clean workspace and the right tools make all the difference.
- Keep the bead in the center channel. This is the secret to creating the slack you need.
- Check the bead seating before full inflation. This is your most important safety check.
Enjoy the ride, and enjoy the confidence that comes with being your own bike mechanic.
Once you’ve mastered mounting a tire, the right equipment makes every ride smoother. The Leoguar 26x4.0 Bike Tire offers reliable grip, durable construction, and a comfortable ride—perfect for replacing worn-out rubber or upgrading your setup. Shop the Leoguar 26x4.0 Bike Tire and keep your bike ready for the road or trail.
Frequently Asked Questions
1. Q: How do I know if my tire and rim are compatible?
A: Check the size markings on your tire's sidewall and match them to your rim specifications. The diameter measurements must match exactly, while width can vary within your rim's acceptable range.
2. Q: Why does my tire keep getting pinch flats during installation?
A: This usually happens when the inner tube gets caught between the tire lever and rim during installation. Always ensure the tube is properly tucked inside the tire and use plastic levers with gentle pressure.
3. Q: How much should I inflate the inner tube before installing it?
A: Add just enough air to give the tube shape but keep it very soft and flexible. Over-inflating makes it harder to install and more likely to get pinched.
4. Q: What should I do if the tire bead won't seat properly?
A: Deflate the tire and check that both beads are sitting in the center channel of the rim. Push the tire around to redistribute it, then slowly reinflate while checking the bead line for even seating.
5. Q: Can I install a bike tire without tire levers?
A: Yes, many tires can be installed completely by hand using proper technique. The key is keeping the tire beads in the center channel and using the palm roll method for tight sections.


Leave a comment