


How to Adjust Chain on Bicycle for Fixed Gear: Clean Tension, No Skips
You can hear it before you feel it—that distinct clatter of a loose chain hitting the chainstay as you ride over a bump. Then comes the unsettling feeling of a sloppy drivetrain, a delay between when you push the pedals and when the bike responds. Worst of all is the dreaded chain skip. That sudden lurch happens when the chain jumps a tooth under pressure. These are not just annoyances. They are signs that your bike is inefficient and, on a fixed gear, potentially unsafe.
This is your definitive guide to achieving perfect chain tension. We're not just talking about silencing a noisy chain. We're talking about unlocking a smoother, more efficient, and fundamentally safer ride. By the end of this article, you will have the skills and confidence to adjust your bicycle chain like a seasoned mechanic. Every pedal stroke will translate directly into silent, forward motion.
Why Tension is Critical
Understanding why correct chain tension is so important is the first step toward mastering it. It's not just about noise. It's about safety, performance, and the longevity of your entire drivetrain. Getting this balance right is a non-negotiable skill for any fixed-gear or single-speed rider.
Loose Chain Dangers
A chain that is too loose poses significant risks. This is especially true on a fixed-gear ebike where your legs are directly connected to the rear wheel's rotation.
- Chain Skip: Under high torque, like when you're starting from a stop or climbing a hill, a loose chain can easily climb up and over the teeth of the cog or chainring. This results in a sudden, jarring slip that can throw off your balance.
- Dropped Chain: In a worst-case scenario, a loose chain can come off the drivetrain completely. On a fixed-gear bike, this can cause the chain to bunch up and instantly lock the rear wheel. This potentially leads to a skid and a serious accident.
- Inefficiency: Even without skipping or dropping, a slack chain wastes energy. The sloppy feeling in the pedals is a tangible loss of power transfer. This makes your ride feel sluggish and unresponsive.
Over-Tight Chain Damage
In an attempt to avoid a loose chain, many riders make the opposite mistake. They over-tighten it. A chain that is too tight creates immense stress and friction, silently wearing down expensive components.
- Accelerated Drivetrain Wear: Excessive tension puts a constant, high-load strain on your chain, chainring, and cog. This wears down the teeth prematurely.
- Bearing Destruction: The most significant hidden damage occurs in your bearings. The constant pulling force places immense lateral stress on the bearings in your rear hub and your bottom bracket. This causes them to grind down and fail much faster than they should. A severely over-tightened chain can accelerate drivetrain wear, leading to component replacements that can cost 3 to 5 times more than the chain itself.
Finding the Sweet Spot
The goal is a "Goldilocks" tension—not too loose, not too tight. This sweet spot ensures maximum power transfer, a near-silent ride, and the longest possible life for all your drivetrain components. It's a perfect balance of performance and preservation. As the legendary mechanic Sheldon Brown noted, proper tension is key to a happy drivetrain. This is a principle we'll put into practice. For a deeper dive into the physics, you can review Sheldon Brown's classic advice on chain tension.
Tools and Preparation
Before we begin wrenching, let's gather the necessary tools. Having everything ready makes the process smooth and professional. This prevents frustration and ensures you do the job right the first time.
Your Essential Toolkit
You don't need a full workshop. Just a few key items will do.
- Wrench (Correct Size): The vast majority of track and single-speed bikes use 15mm nuts on the rear axle. Using the correct size is critical to avoid rounding and stripping the nuts. A good quality box-end wrench is preferable to an adjustable one.
- Bike Stand (Recommended): A repair stand holds the bike securely at a comfortable working height. This allows the rear wheel to spin freely. It makes every step of the process significantly easier.
- Alternative (If No Stand): If you don't have a stand, you can carefully flip the bike upside down. Rest it on its saddle and handlebars. Place a thick cloth or mat on the ground to protect your saddle and grips from scuffs.
- Clean Rags: You'll need one for handling the greasy chain and another for wiping down components.
- Chain Lubricant: This is the final step after the adjustment is complete to ensure everything runs smoothly.
Pro Tip: If you own a torque wrench with a 15mm socket, this is the perfect time to use it. Tightening your axle nuts to the manufacturer's specified torque (usually around 30-40 Nm) ensures they are secure without being over-tightened.
The 5-Step Adjustment
This is the core method for adjusting chain tension on a bike with horizontal or track-style dropouts. We will move methodically to ensure both tension and alignment are perfect.
Step 1: Loosen Axle Nuts
With your 15mm wrench, begin by loosening the axle nuts on both the left (non-drive) and right (drive) sides of the rear wheel. You don't need to remove them completely. Just loosen them enough so that the wheel can slide forward and backward within the dropouts. A quarter to a half turn is usually sufficient.
Step 2: Create Tension
This step requires a bit of finesse. Stand behind the bike and grip the rear tire with both hands. Gently and evenly pull the wheel straight back in the dropouts. As you pull, you will see the slack in the chain disappear. The goal is to make small, incremental movements. You can feel the chain go from slack to taut. Pull it back until the chain looks straight and has only a small amount of give.
Step 3: Check Tension
Now, we perform our initial tension check. Go to the middle of the chain, halfway between the front chainring and the rear cog. Using your finger, push the chain up and then down. The total amount of movement, or "play," should be about 1/2 inch (or roughly 1 to 1.5 cm). This is a widely accepted standard; as a reference, Park Tool outlines that finding the correct chain tension is a critical safety check. If it moves significantly more, you need to pull the wheel back further. If it's rigid with almost no movement, you've gone too far and need to push the wheel forward slightly.
Step 4: Ensure Wheel Alignment
This is a crucial step that is often overlooked. A misaligned wheel will cause inconsistent chain tension, strange handling, and potential tire rub against the frame. To check alignment, look at the gap between the tire and the chainstay on both sides of the bike. This gap should be equal. You can use your eye or even your fingers as a makeshift gauge. If it's off-center, gently nudge the left or right side of the axle forward or backward within the dropouts until the wheel is perfectly centered.
Step 5: Tighten the Axle Nuts
Once you are satisfied with both the tension and the alignment, it's time to secure the wheel. The key here is to tighten the nuts alternately to prevent the wheel from shifting. Start by lightly snugging the drive-side nut. Then, move to the non-drive side and snug that one. Go back and forth between the two, tightening each one a little more each time, until both are firmly tightened. Give the tension and alignment one final check to ensure nothing moved during the tightening process.
Mastering the 'Feel'
The half-inch rule is an excellent starting point. However, truly mastering chain tension involves developing a feel for it. Every drivetrain has its own unique characteristics due to wear and component variations. Learning to diagnose tension with your senses is what separates a good mechanic from a great one.
Beyond the Half-Inch Rule
Think of the 1/2-inch measurement as a guideline, not an absolute law. The perfect tension can vary slightly based on the age of your chain, the quality of your chainring, and even your riding style. The goal is to use the rule to get you in the ballpark, then fine-tune based on sight, sound, and touch.
A Multi-Sensory Check
- Visual: A well-tensioned chain should appear straight and clean when viewed from the side. It should not have a noticeable "droop" or sag in the middle.
- Tactile: This is the most important sense. When you press on the middle of the chain, it should feel firm, but not completely rigid. It should have a slight, springy quality. A chain that is too tight feels dead and hard, like a guitar string tuned too high. A chain that is too loose feels mushy and offers little resistance.
- Auditory: A clean, well-lubricated, and properly tensioned chain is nearly silent. If you hear a constant, high-pitched "whirring" or "grinding" noise, especially when pedaling hard, your chain is likely too tight. If you hear a "clattering" or "slapping" sound, it's too loose.
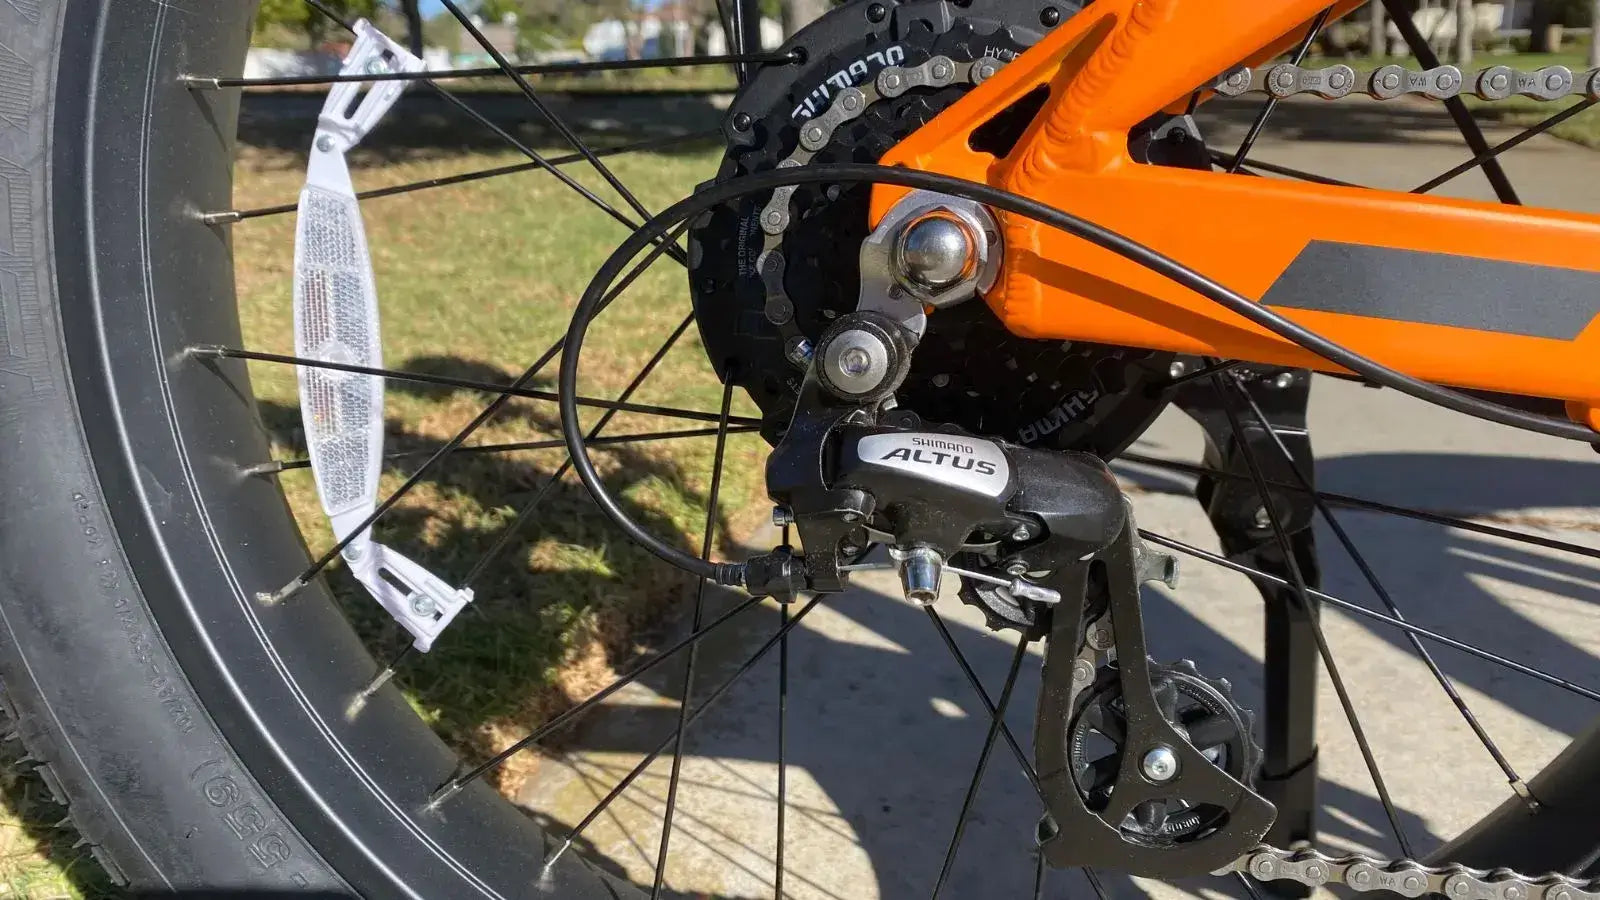
Checking for Tight Spots
No drivetrain is perfectly round. Due to slight imperfections and uneven wear on the chainring and cog, most drivetrains have a "tight spot" and a "loose spot." It is absolutely critical to find the tightest spot in the chain's rotation and set your tension there. To do this, slowly rotate your pedals backward, stopping every quarter rotation to check the tension. You will likely find one spot where the chain feels noticeably tighter. Adjust your tension based on this tightest point. If you set it at the loosest point, the chain will bind and grind when it hits the tight spot.
Tension Cheat Sheet
Use this table as a quick reference to diagnose your chain tension.
| Symptom | Too Loose | Just Right | Too Tight |
|---|---|---|---|
| Sound | Clattering, slapping against chainstay | Nearly silent | Whirring, grinding noise |
| Feel (Pedaling) | Sloppy, delayed engagement, skipping | Direct, responsive, smooth | Stiff, high-resistance, notchy |
| Feel (Pushing) | Spongy, excessive give (>1 inch) | Firm with slight give (~1/2 inch) | Rock solid, no give |
Pro-Level Adjustments
Once you've mastered the basics, a few extra techniques and pieces of hardware can elevate your setup. These make adjustments more precise and troubleshooting common issues easier.
Using Chain Tugs
Chain tugs, also known as chain tensioners, are small hardware devices that fit into the rear dropouts. They use a small screw to push or pull the axle into a precise position. If your frame has them, they are a game-changer. The process becomes even more controlled:
- Loosen the main axle nuts as usual.
- Instead of pulling the wheel back by hand, simply turn the small adjustment bolts on the chain tugs.
- Turn each bolt in small, equal increments (e.g., a quarter turn at a time) to pull the wheel back evenly.
- This allows for incredibly fine micro-adjustments and also helps prevent the wheel from slipping forward under high pedaling force.
Fixing Wheel Alignment
A common point of frustration is having the wheel shift out of alignment just as you tighten the final nut. The axle can "creep" forward on one side. A pro tip is to use your body to help. As you perform the final tightening on one nut, use the thumb of your other hand to brace the axle against the back of the dropout. This physical block prevents it from being pulled forward by the tightening force. Applying firm, steady pressure is key.
When to Replace Your Chain
Sometimes, no amount of adjustment can fix a problematic chain. Chains don't actually "stretch"; rather, the pins and rollers wear down, increasing the distance between each link. This wear is permanent. If your chain is excessively worn:
- It will never hold tension properly.
- It will feel sloppy even when adjusted.
- Most importantly, a worn chain will rapidly wear out your more expensive chainring and cog, turning a simple chain replacement into a full drivetrain overhaul.
We recommend using a chain wear indicator tool. It's an inexpensive, simple gauge that tells you precisely when your chain is worn beyond its service life (typically at 0.75% wear for single-speed). If the tool indicates it's time for a replacement, adjusting the tension is only a temporary and damaging fix.

Final Touches and Testing
You've done the hard work. The chain is tensioned, and the wheel is aligned. Now for the final steps that ensure a long-lasting, smooth-running setup.
Clean and Lubricate
A newly adjusted chain deserves to be clean and well-lubricated.
- Take a clean rag and wipe down the entire length of the chain to remove any grime and old lube.
- Apply one small drop of your preferred chain lubricant to the top of each roller on the chain.
- Slowly pedal backward for 10-15 seconds to allow the lube to work its way into the rollers and pins.
- Let the lubricant sit for a few minutes to fully penetrate.
- Crucially, take another clean rag and thoroughly wipe off all the excess lubricant from the outside of the chain. Excess lube on the outside does not help performance and only attracts dirt, which accelerates wear.
The Final Test Ride
The job isn't done until you've tested it on the road. Go for a short, controlled ride around the block. Pay close attention to the sensations.
- Listen: Is the drivetrain silent? Any new whirring or clicking sounds?
- Feel: Does the pedal stroke feel direct and responsive? Do you feel any binding or notchiness, which could indicate a tight spot?
- Try a brief, hard acceleration from a low speed. The chain should engage smoothly with no hint of skipping.
If everything feels and sounds right, you've successfully completed the adjustment.
Ride with Confidence
You've now transformed a noisy, inefficient drivetrain into a silent, responsive, and safe one. Adjusting your chain is a fundamental skill that empowers you as a rider, connecting you more deeply to your machine. Regular checks and adjustments will not only improve the quality of every ride but also significantly extend the life of your e bike components. Ride on with the confidence that your bike is perfectly tuned.
Frequently Asked Questions
1. Q: How often should I check my chain tension?
A: Check your chain tension every 2-3 weeks or after every 100-150 miles of riding. If you notice any noise, skipping, or changes in how the bike feels when pedaling, check it immediately. Regular checks help prevent component damage and ensure optimal performance.
2. Q: What happens if I ride with a chain that's too tight?
A: An over-tight chain puts excessive stress on your bearings, chainring, and cog, causing them to wear out much faster than normal. It can also make pedaling feel stiff and resistant. The constant strain can damage your bottom bracket and rear hub bearings, leading to expensive repairs.
3. Q: Can I adjust chain tension on a bike with vertical dropouts?
A: No, this guide applies only to bikes with horizontal or track-style dropouts where the wheel can slide forward and backward. Bikes with vertical dropouts (most modern bikes) use derailleurs or chain tensioners to manage chain tension automatically.
4. Q: Why does my chain feel tight in some spots and loose in others?
A: This is normal due to slight imperfections in the chainring and cog. Always adjust your tension at the tightest spot in the rotation. Slowly pedal backward and stop every quarter turn to find where the chain feels tightest, then set your tension based on that position.
5. Q: How do I know if my chain is worn out and needs replacement?
A: Use a chain wear indicator tool to measure stretch. For single-speed bikes, replace the chain when it reaches 0.75% wear. Signs of a worn chain include difficulty maintaining proper tension, sloppy feel even when adjusted correctly, and visible elongation of the chain links.


Leave a comment