


How Do You Tighten a Chain on a Bicycle: Complete Guide
Why a Taut Chain Matters
That noisy clatter and sloppy feeling in your pedals is a sound no cyclist wants to hear. A loose chain isn't just loud. It's a sign that your bike needs attention, and the good news is that learning how to tighten a bicycle chain is a basic skill that helps you keep your ride safe, smooth, and working well.
The quick answer is this: tightening a bicycle chain on most single-speed bikes means loosening the rear axle nuts, pulling the wheel back to create tension, and then securing everything again. Proper tension is important. It makes sure power moves directly from your legs to the wheel, stops the chain from falling off (which is dangerous), and reduces early wear on your bike parts.
This guide will walk you through everything you need to know. We'll cover the tools you need, give step-by-step instructions for the most common bike types, and talk about the special things to consider for the increasingly popular ebike chain.
Essential Tools and Prep
Before you begin, getting the right tools and setting up your workspace will make the job much easier and safer. A little preparation prevents a lot of problems. First, secure your bike properly. A bike stand is the best option because it holds the bike securely at a comfortable working height and lets you spin the pedals and wheel freely. If you don't have one, you can carefully flip the bike upside down, resting it on its seat and handlebars. Just be careful of any computers, lights, or delicate shifters on the handlebars, and place a protective cloth on the ground.
Here is a clear list of what you'll need to get the job done right. Having these items ready will make the process smooth.
| Tool | Purpose & Key Details |
|---|---|
| Wrench or Socket Set | To loosen and tighten the rear axle nuts. The most common size is 15mm, but it's wise to have a set to ensure you have the perfect fit. Using the wrong size can strip the nut. |
| Allen/Hex Keys | Some modern bikes use Allen bolts instead of nuts for the axle. They are also often required for adjusting dedicated chain tensioner devices. |
| Bike Stand | Highly Recommended. It simplifies the entire process, especially wheel alignment. |
| Clean Rags | Essential for handling a greasy chain, wiping down components, and general cleanup. |
| Gloves | Optional but Recommended. Nitrile or mechanic's gloves will keep grease off your hands. |
Single-Speed or Fixed-Gear Bikes
This is the most common situation where you'll need to manually tighten a chain. The process is simple, but the key is to make small, careful adjustments. Follow these steps for a perfectly tensioned chain.
-
Mount the Bike. Secure the bike in your stand or flip it upside down. Make sure it's stable before you start applying any force with your tools.
-
Loosen the Axle Nuts. Using your 15mm wrench (or the correct size for your bike), loosen the nuts on both sides of the rear axle. You don't need to remove them completely—just loosen them enough so the wheel can slide backward and forward within the frame's slots, which are called dropouts.
-
Adjust the Tension. This is the part that requires a bit of feel. Gently pull the rear wheel straight back in the dropouts. As you do, watch the chain closely. You will see it go from slack to tight. The goal is not to make it guitar-string tight; over-tightening is a common mistake that can cause too much friction and rapid wear on your bearings and bike parts.
-
Check the Tension. This is the most important step. Go to the middle of the chain, halfway between the front chainring and the rear cog. Using your finger, press down and then up on the chain gently. For best performance and long life, it should have about half an inch (or 1-1.5 cm) of total up-and-down play. If it's much tighter, nudge the wheel forward slightly. If it's looser, pull it back a little more.
-
Align the Wheel. Once you're happy with the tension, you must make sure the wheel is perfectly centered between the frame's chainstays. Look at the gap between the tire and the frame on both the left and right sides carefully. It should be equal on both sides. An unaligned wheel will cause the brakes to rub and the drivetrain to run poorly.
-
Tighten the Axle Nuts. While holding the wheel firmly in its aligned position, begin to tighten the axle nuts. It's best practice to tighten them bit by bit, switching between the left and right sides. This makes sure there's even pressure and prevents the wheel from shifting out of alignment as you secure it.
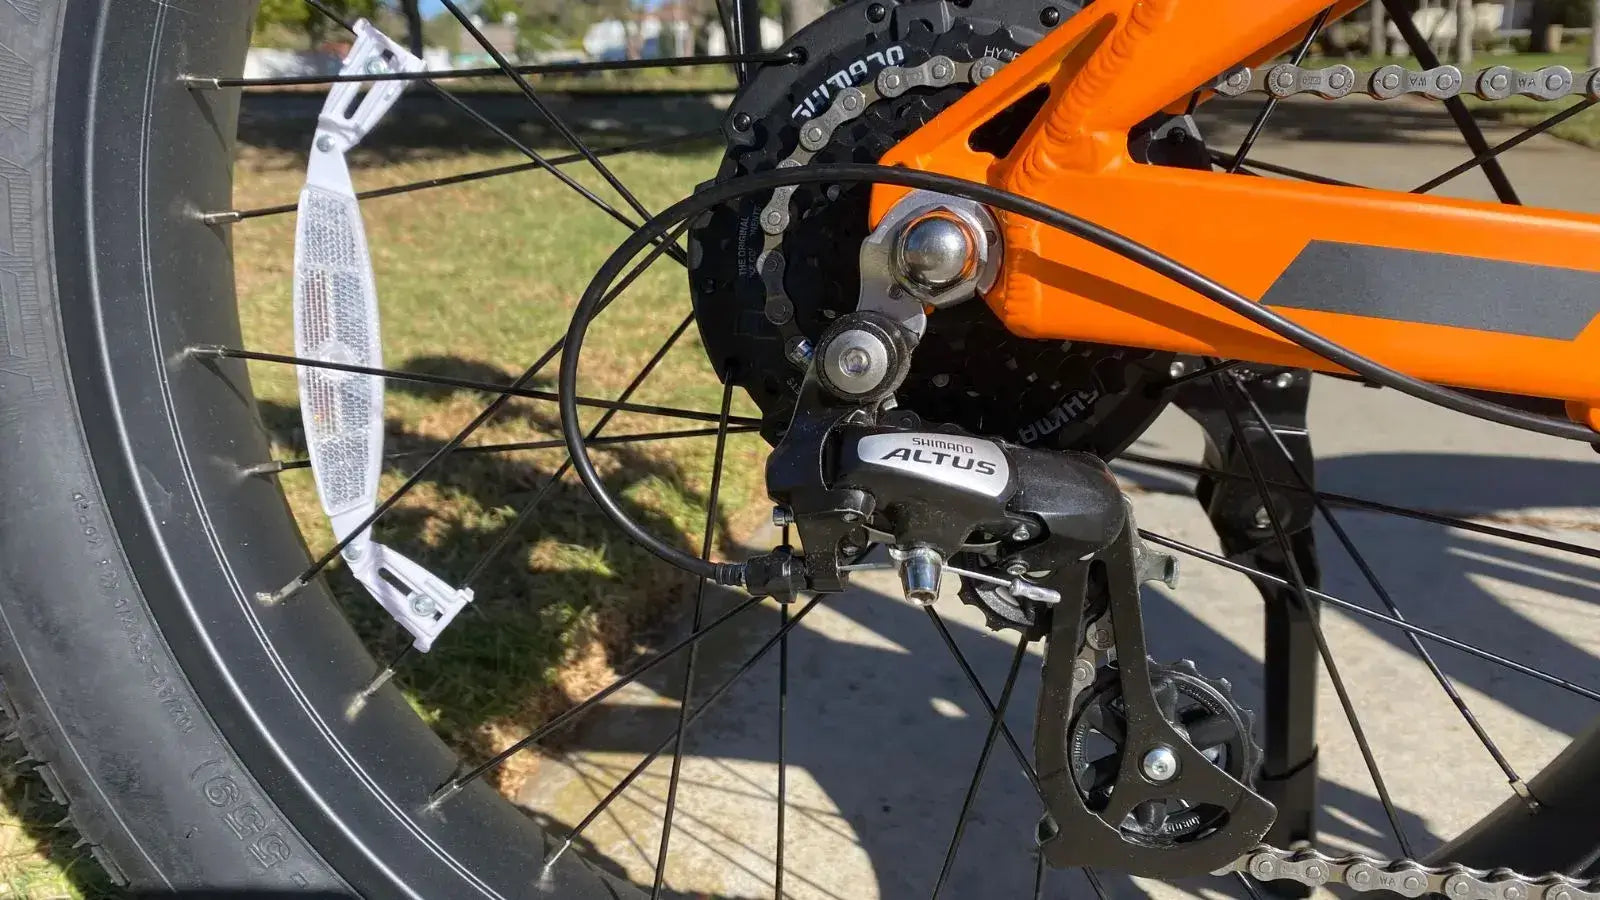
What About Multi-Gear Bikes?
If you have a bike with multiple gears and a derailleur, you might be wondering how this process applies to you. The simple answer is: it doesn't work the same way.
On a geared bike, chain tension is managed automatically by the rear derailleur. The spring-loaded mechanism, known as the derailleur cage (the part with the two small pulleys), is designed to pivot and take up chain slack as you shift between different-sized cogs. It keeps consistent tension across your entire gear range without any manual adjustment.
If the chain on your geared bike feels too loose, is slapping against the frame, or is falling off, the problem is not something you can fix by pulling the wheel back. Instead, it points to another issue that needs different solutions. The most common causes are:
- An Incorrectly Sized Chain: The chain may simply be too long for your drivetrain, often after a recent replacement.
- A "Stuck" Derailleur Pivot: The pivots on the derailleur can become gummed up with dirt and old lubricant, preventing the spring from doing its job.
- A Worn-Out Derailleur Spring: Over time, the spring inside the derailleur can lose its strength and will no longer be able to apply adequate tension.
In these cases, the solution involves addressing the root cause. Often, a thorough cleaning and re-lubrication can free up a sticky pivot, and we highly recommend regularly maintaining your drivetrain components to prevent these issues. If the problem continues, the chain may need to be shortened or the derailleur may need to be replaced.
The E-Bike Difference
The rise of electric bikes has introduced new considerations for drivetrain maintenance. An ebike chain is not just a standard chain on a bike with a motor; it's a component that faces a unique set of demands, and understanding this is key to proper care.
Why an Ebike Chain is Different
The core difference is torque. An e-bike motor, whether it's a hub-drive or mid-drive, puts much more force through the drivetrain than human legs alone can produce. This increased stress means a standard bicycle chain would wear out and potentially fail very quickly under these conditions. To combat this, dedicated e-bike chains are built with stronger materials, featuring reinforced plates and hardened, peened pins that can withstand these higher loads without stretching or breaking.
The Tightening Process
The method for tightening an ebike chain depends on its motor and drivetrain type.
- For e-bikes with a rear hub motor and a single gear, the process is identical to the single-speed guide above. You will loosen the axle nuts, pull the wheel back to set tension, align it, and re-tighten everything securely.
- For mid-drive e-bikes, the motor is located at the cranks, and the rear wheel functions just like a non-electric bike. If it's a single-speed mid-drive, follow the single-speed guide exactly. If it has a derailleur, the tension is managed automatically, as explained in the previous section.
A pro tip from our workshop experience: because of the higher forces involved, getting the tension right on a single-speed ebike chain is even more critical. We've seen that a slightly-too-tight chain can lead to accelerated wear on expensive motor-integrated chainrings and rear cogs, so always stick to the half-inch play rule.
E-Bike vs. Standard Chain
This table highlights the key differences you should be aware of, especially when it comes time for a replacement.
| Feature | Standard Bicycle Chain | Dedicated E-Bike Chain |
|---|---|---|
| Durability | Designed for human power output | Reinforced pins & plates for motor torque |
| Wear Rate | Slower wear rate | Faster wear rate due to higher stress |
| Cost | Generally less expensive | Often more expensive due to stronger materials |
| Compatibility | Must match the number of gears | Must match gears AND be e-bike rated |
Pro-Level Knowledge
Once you've mastered the basics, a few extra pieces of knowledge can help you troubleshoot common issues and extend the life of your entire drivetrain. This is how you go from simply fixing a problem to truly understanding your bike.
Troubleshooting Uneven Tension
Have you ever noticed that your chain seems tight in one spot of the pedal stroke and loose in another? This is a common issue, and it's almost never the fault of the chain itself. This "tight spot" is typically caused by a front chainring that is slightly out-of-round or not perfectly centered on the crank.
To solve this, find the spot in your pedal rotation where the chain is at its tightest. This is the point where you should set your tension properly. Adjust the wheel so you have that target half-inch of play at this tightest spot, which ensures that the chain never becomes dangerously over-strained during rotation. For a deeper dive into this phenomenon, we recommend the expert advice from Sheldon Brown, a legendary resource in the cycling community.
Using Chain Tensioners
Some single-speed bikes, particularly those in the BMX or track bike world, come equipped with chain tensioners. These are small, simple devices that fit into the rear dropouts and use a screw mechanism to push or pull the axle into position precisely. If your bike has these, the process is even easier than the standard method. Loosen the main axle nuts, and then turn the small tensioner bolts on each side to make fine, precise adjustments to the chain tension. They are a fantastic feature because they make it incredibly easy to pull the wheel back evenly, ensuring perfect alignment every time.
The Importance of Lubrication
A properly tensioned but dry chain is an unhappy chain. Lubrication is essential for a healthy drivetrain because it reduces friction, which means less wear, a quieter ride, and more efficient power transfer. The process is simple:
- Always start with a clean chain. Applying lube to a dirty chain just creates a gritty grinding paste that damages components.
- Use a quality, bike-specific chain lubricant designed for your riding conditions.
- Apply one small drop of lube to the top of each roller on the inside of the chain.
- Let it sit for a few minutes to penetrate, then use a clean rag to thoroughly wipe off all the excess from the outside of the chain. Excess lube only attracts more dirt and debris.

When to Replace, Not Just Tighten
Chains don't last forever. Over hundreds of miles, the pins and rollers wear down, causing the chain to effectively "stretch" beyond its original specifications. This wear is the number one killer of more expensive drivetrain parts like cassettes and chainrings because a worn chain no longer fits perfectly with the teeth of the cogs, leading to poor shifting and accelerated wear.
If you find yourself having to tighten your chain constantly, it's a strong sign that it's worn out and needs to be replaced. The most accurate way to check this is with a chain wear indicator tool, which is an inexpensive tool that measures the elongation. As a rule of thumb, you should replace your chain when it reaches 0.5% to 0.75% wear, and doing so can often allow you to get two or even three chains' worth of life out of a single cassette, saving you significant money in the long run.
Frequently Asked Questions
Q: How often should I check my bicycle chain tension?
A: You should check your chain tension every few weeks or after about 100-200 miles of riding. If you notice any unusual noises, chain slipping, or changes in how your bike feels while pedaling, check the tension immediately.
Q: What happens if my chain is too tight?
A: An overly tight chain puts excessive stress on your bearings, chainring, and rear cog, leading to premature wear and potential component failure. It also makes pedaling harder and less efficient, and can cause your chain to break under stress.
Q: Can I use a regular bicycle chain on my e-bike?
A: While a regular chain might work temporarily, it's not recommended for e-bikes. E-bike chains are specifically designed to handle the extra torque from electric motors and will last much longer and perform better than standard chains on electric bikes.
Q: Why does my chain keep getting loose even after I tighten it?
A: If your chain keeps loosening, it's likely worn out and has "stretched" beyond its useful life. Worn chains cannot maintain proper tension and should be replaced. Other causes include loose axle nuts or worn dropout slots in your frame.
Q: Is it normal for my chain to make some noise?
A: A properly tensioned and lubricated chain should run quietly. Some slight noise is normal, especially on single-speed bikes, but loud clattering, grinding, or squeaking indicates problems with tension, lubrication, or component wear that need attention.


Leave a comment