


Why Adjustable Handlebar Stems Matter for E-Bike Comfort
E-Bike Comfort Problems
The fun of riding your e-bike can disappear fast if you hurt while riding. Back pain, neck stiffness, and numb hands are common problems that make riding feel like work instead of fun. Most of the time, the problem isn't your bike but how it fits your body. Your handlebar position controls how you sit and how comfortable you feel on long rides. An adjustable handlebar stem is a simple upgrade that lets you get the perfect fit for your body and riding style. This guide will show you what an adjustable bike handlebar stem is, explain why e-bike riders need them, help you pick the right one, and teach you how to set it up for the best comfort and control.
E-Bike Ergonomics Challenge
Old bike fitting rules don't always work for e-bikes because electric bikes create new comfort challenges. E-bikes change how forces work and how long people ride. Understanding these differences helps solve e-bike comfort problems.
Why E-Bikes Change Comfort
E-bikes aren't just regular bikes with motors - they need a different approach to rider comfort. The extra weight and higher speeds make any posture problems worse than on regular bikes. E-bikes weigh 40-80 pounds compared to regular bikes that weigh 17-30 pounds. This extra weight, plus faster average speeds, means bumps and vibrations hit your body harder. A slightly bent-over position that feels okay on a regular bike can hurt a lot on an e-bike.
E-bikes also make riding easier, so people take longer and more frequent trips. A 10-mile ride that seemed too hard before becomes a daily routine. More time riding means small comfort problems that you might not notice on short rides become constant pain sources. Many e-bike models, especially those made for commuting, cruising, or carrying cargo, make riders sit more upright. This position helps you see better but puts more weight on your lower back and seat bones instead of your hands and feet, making handlebar height and distance very important for balanced, comfortable posture.
What is an Adjustable Stem?
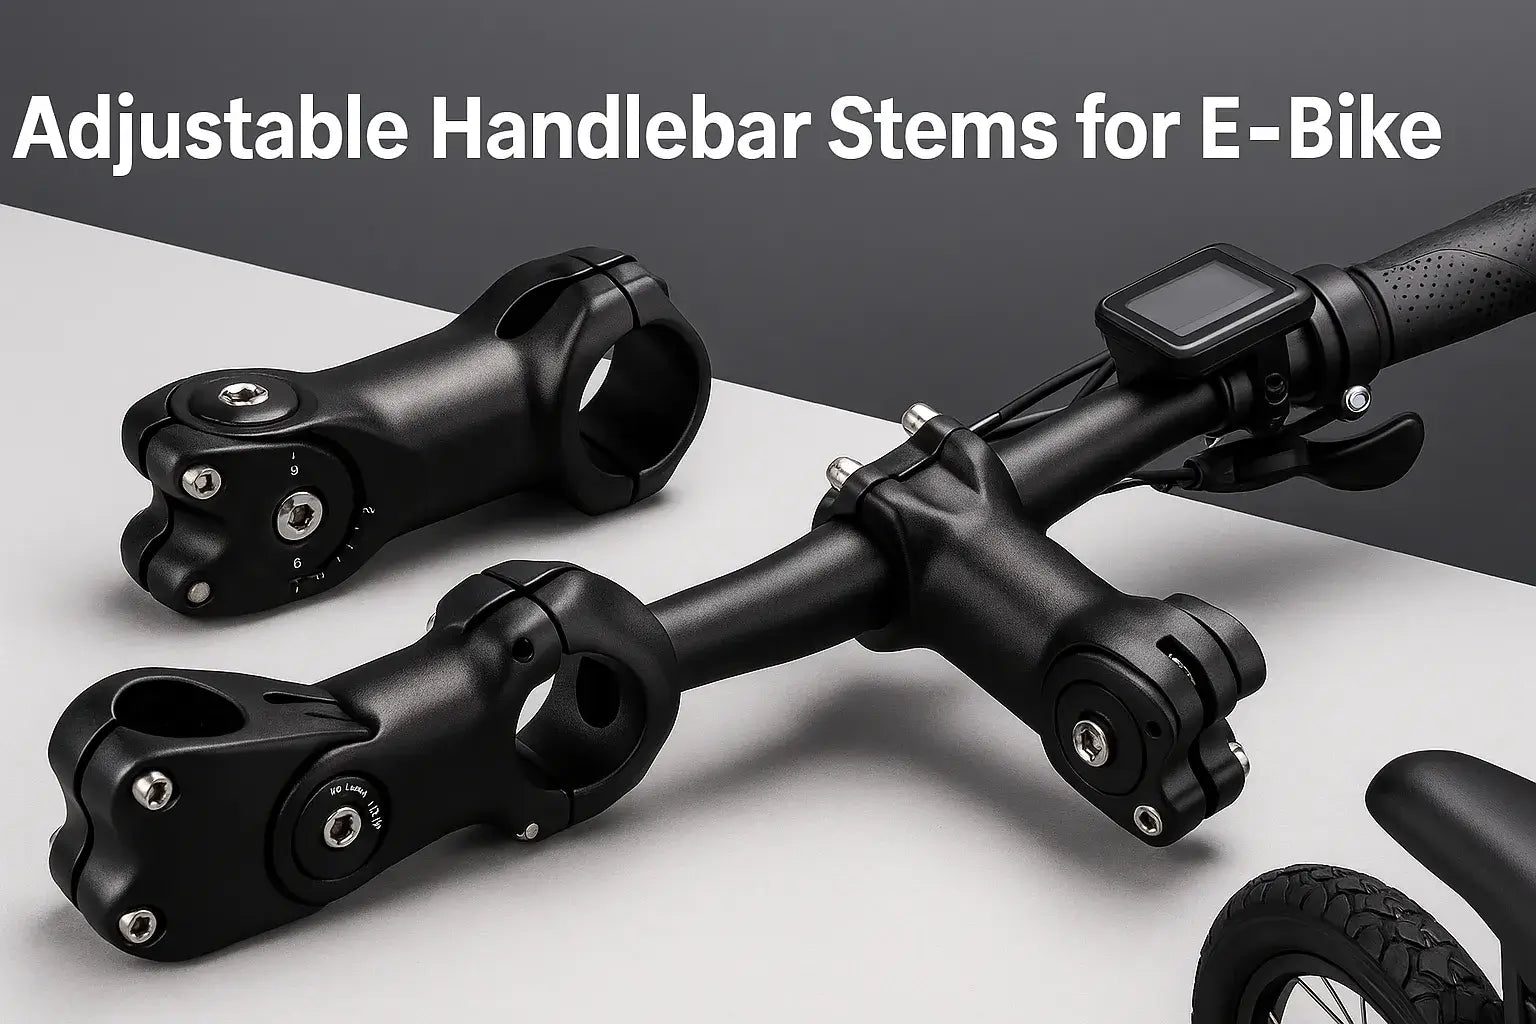
An adjustable handlebar stem connects your handlebars to your bike's fork, but it has a special pivot that lets you change its angle. Before you can see its benefits, you need to understand exactly what it is and how it differs from other parts.
Anatomy of an Adjustable Stem
An adjustable stem has several key parts that work together to give you control over your riding position. The steerer tube clamp slides over and grips the fork's steerer tube tightly. The handlebar clamp, usually with two or four bolts, holds the handlebars securely in place. The pivot bolt acts as the hinge, letting the stem move up and down to change your handlebar position. An angle indicator, marked in degrees, shows you the exact angle setting. A locking bolt secures the pivot once you find your perfect position.

Stems vs. Risers
People often mix up adjustable stems with stem risers, but they do different jobs. A stem riser only adds vertical height to your handlebars. An adjustable bike handlebar stem changes both height and reach (how far forward the handlebars are) by changing the stem's angle. This gives you much more control over fine-tuning your position. For more information about stem types, check out how bike stems explained by BikeRadar.
Here's a clear comparison:
| Feature | Adjustable Stem | Fixed Stem | Stem Riser (Extender) |
|---|---|---|---|
| Adjustability Range | High (Angle & Height) | None (Fixed Angle & Rise) | High (Height Only) |
| Ease of Fine-Tuning | Excellent | Poor (Requires Replacement) | Good for height, no reach adjust |
| Cost | Moderate | Low to High | Low to Moderate |
| Best Use Case | Dialing in comfort, multi-use bikes | Performance, weight-conscious builds | Gaining significant height on a budget |
4 Key E-Bike Benefits
An adjustable stem helps any cyclist, but it offers special advantages for e-bike riders. These benefits go beyond comfort and address control, safety, and flexibility issues that are bigger problems with electric bikes.
1. Eliminating Pain
This benefit helps you feel better right away. Leaning forward forces your lower back to support your upper body and makes you bend your neck to see ahead. Using an adjustable stem to raise the handlebars reduces this forward lean, letting your spine stay in a more natural, upright position. This immediately takes pressure off your lower back and reduces strain on your neck and shoulder muscles. Even a small 10-15 degree upward change can shift your posture from a painful hunch to a comfortable, sustainable position, especially on rides longer than 30 minutes.
2. Reducing Numbness
Tingling fingers or numb hands happen when you put too much weight on your hands or bend your wrists wrong. An adjustable handlebar stem fixes this in two ways. First, raising the handlebars shifts your weight backward, taking pressure off your hands. Second, changing the stem's angle also changes how your wrists bend when they rest on the grips. Finding a neutral, relaxed wrist position prevents nerve compression in the carpal tunnel area, letting you ride for hours without discomfort.
3. Improving Control and Visibility
This safety benefit is very important for e-bike riders, especially in cities. E-bikes go faster and weigh more, so you need confident handling. A more upright riding position gives you a wider, clearer view, helping you spot traffic, pedestrians, and road dangers better. It also changes how the bike handles. While leaning forward can help with high-speed wind resistance, it can make a heavy e-bike feel unstable at lower speeds or during tight turns. Bringing the handlebars up and back often makes the bike feel more stable and predictable, making you more confident.
4. Creating a Versatile Bike
Many people use their e-bike for everything - fast weekend fitness rides, easy weekday commutes, and grocery runs. These different activities work better with different riding positions. An adjustable stem turns your e-bike into a multi-purpose machine. You can set a lower, more aggressive angle for a long, fast ride on open roads. Then, in just a few minutes, you can raise it to a comfortable, upright position for your daily commute. This flexibility means you don't have to compromise - you can have the perfect setup for every ride.
How to Choose Your Stem
Picking the right adjustable handlebar stem is easy once you know what to look for. Getting the right fit is key, and it comes down to three important measurements and a couple of key features. Getting this right makes installation safe and easy.
The Compatibility Trinity
Before you buy, you must check three measurements on your current bike. This prevents the frustration of ordering a part that doesn't fit.
-
Steerer Tube Diameter: Most modern bikes use a threadless headset system with a 1 1/8 inch (or 28.6mm) diameter steerer tube. You can check this by measuring the tube your current stem clamps onto. If you have an older bike with a quill stem (a single bolt on top that goes down into the fork), you will need a quill-to-threadless adapter to use a modern adjustable stem.
-
Handlebar Clamp Diameter: This is how wide your handlebars are where the stem clamps on. The two most common sizes are 31.8mm (the modern standard for most e-bikes and mountain bikes) and 25.4mm (common on older bikes and some cruisers). This measurement is often printed on your existing stem or handlebar.
-
Stem Length: Adjustable stems come in different lengths (like 90mm, 110mm). This is how long the stem's body is. If your current fit feels too stretched out, choose a slightly shorter length. If you feel too cramped, choose a longer one. A good starting point is to pick a length similar to your current stem.
Angle Range and Material
Look at the adjustment range offered, often shown as something like "0-60°" or "+/- 85°". A wider range gives you more options for fine-tuning your fit. For most e-bike comfort needs, a 0-60° or 0-90° range is more than enough. For material, most quality adjustable stems are made from forged aluminum. This gives an excellent balance of strength, stiffness, and low weight, making it perfect for handling the extra forces of an e-bike. To better understand how this works, you can read about the principles of handlebar height adjustment.

Dialing In Your Perfect Fit
Installing the stem is only half the work. The real value of an adjustable bike handlebar stem comes from the process of making it perfect for you. We recommend a careful, step-by-step approach - the same one professional bike fitters use - to find the setting that works perfectly for you.
Step 1: Establish Your Baseline
Before you change anything, take a side photo of your bike with the old stem. More importantly, think about your current comfort level. Where does it hurt? When does it start to hurt? Is it your back, neck, or wrists? This baseline helps you measure improvement.
Step 2: The Initial Installation
Follow the manufacturer's instructions to install the new stem. Don't fully tighten the pivot or handlebar clamp bolts yet. As a starting point, set the adjustable stem to a neutral, middle angle (like 30 degrees on a 0-60° stem). This gives you room to adjust in either direction.
Step 3: The "Micro-Adjustment" Method
This is the most important phase. Finding your comfort sweet spot takes small, gradual changes and testing.
-
Make One Small Change at a Time: Adjust the stem angle by only 5-10 degrees. This may not seem like much, but it can make a huge difference in how the bike feels.
-
Go for a Short Test Ride: Ride around the block for at least five minutes. Don't just sit on the bike in the garage. You need to feel the position while actually riding. Pay close attention to your back, neck, and wrists. Is it better or worse than before?
-
Adjust and Repeat: Based on your test ride, make another small adjustment. If you need to sit more upright, raise the angle. If you went too far, lower it. Keep doing this until you find a position that feels neutral and comfortable for long rides.
-
Don't Forget Handlebar Roll: Once the stem angle feels right, you can make one last small adjustment. Loosen the handlebar clamp bolts slightly and roll the handlebars forward or backward a tiny amount. This fine-tunes how your wrists angle on the grips and can be the final touch for perfect comfort.
Step 4: The Final Torque-Down
Once you're completely happy with the position, it's time to make it safe. Use a torque wrench to tighten all bolts - the steerer tube clamp, the pivot lock, and the handlebar clamp - to the manufacturer's specified tightness. This is usually printed on the stem itself and is typically between 5-7 Nm. This step is critical for your safety and cannot be skipped.
Safety First: Common Mistakes
An adjustable handlebar stem is safe and reliable when installed correctly. However, a few common mistakes can be dangerous. Avoiding these problems is essential for worry-free riding.
Under-tightening Bolts
The most dangerous mistake is not tightening the bolts properly. The pivot bolt and handlebar clamp bolts must be tightened to the manufacturer's specification. If they're too loose, the handlebars could suddenly rotate down when you hit a bump, or the stem could slip on the steerer tube, causing you to lose complete control. Always use a torque wrench - it's the only way to be sure the bolts are tight enough without being so tight that you damage the part.
Ignoring Cable and Hose Length
When you raise your handlebars, you increase the distance that your brake hoses and shifter cables must travel. Before you start, check that you have enough slack. Turn the handlebars fully left and right - the cables should not become tight, kinked, or pull at their connections. If they're too short, raising the handlebars can hurt steering, cause accidental braking, or damage the cables and parts. Sometimes you may need longer cables and hoses installed by a professional mechanic.
Incorrect Headset Preload
This is a more technical but vital part of threadless stem installation. The headset is the set of bearings that lets your fork steer smoothly. The pressure on these bearings is set by the top cap bolt before you tighten the stem's side bolts. If there's play (a rocking feeling when you hold the front brake and push the bike back and forth), your headset is too loose. If the steering feels stiff or bumpy, it's too tight. The stem's side bolts actually clamp it to the fork and hold everything together. Getting this order wrong can cause early wear of your headset bearings and an unsafe connection between your fork and handlebars.
Is an Adjustable Stem Worth It?
For most e-bike riders who have discomfort, the answer is definitely yes. An adjustable handlebar stem is one of the most affordable and effective upgrades you can make. It directly fixes the most common pain sources - back, neck, and wrist strain - by letting you correct the main problem of poor riding posture.
Beyond comfort, it makes control and safety better by putting you in a more aware, upright position, and it adds flexibility that lets your single e-bike adapt perfectly to different types of rides. By taking time to choose the right model and following a careful process to set up your fit, you're not just adding a new part to your bike - you're taking control of your riding experience. You're giving yourself the power to transform your e-bike from a source of frustration into a smooth extension of your body, ready for thousands of miles of comfortable, confident riding.
FAQ
Q: How long does it take to install an adjustable handlebar stem?
A: Installation typically takes 30-45 minutes for someone with basic bike maintenance skills. The adjustment process to find your perfect position may take another 15-30 minutes of test riding and fine-tuning.
Q: Can I install an adjustable stem on any e-bike?
A: Most modern e-bikes with threadless headsets can use adjustable stems, but you need to check three measurements: steerer tube diameter (usually 1 1/8"), handlebar clamp diameter (usually 31.8mm or 25.4mm), and stem length compatibility.
Q: Will raising my handlebars make my e-bike slower?
A: Raising handlebars slightly reduces aerodynamics, but for most e-bike riders, the comfort and control benefits far outweigh any small speed loss. The motor assistance also minimizes the impact of increased wind resistance.
Q: How often should I check the bolts on my adjustable stem?
A: Check bolt tightness every month or after any significant impact. Use a torque wrench to ensure bolts are tightened to manufacturer specifications (typically 5-7 Nm) for safety.
Q: What's the difference between an adjustable stem and just flipping my current stem upside down?
A: Flipping a traditional stem only gives you one alternative angle, while an adjustable stem provides a continuous range of angles (typically 60-90 degrees of adjustment) that you can fine-tune and change as needed.


Leave a comment